added the word "occurs"
Source Link

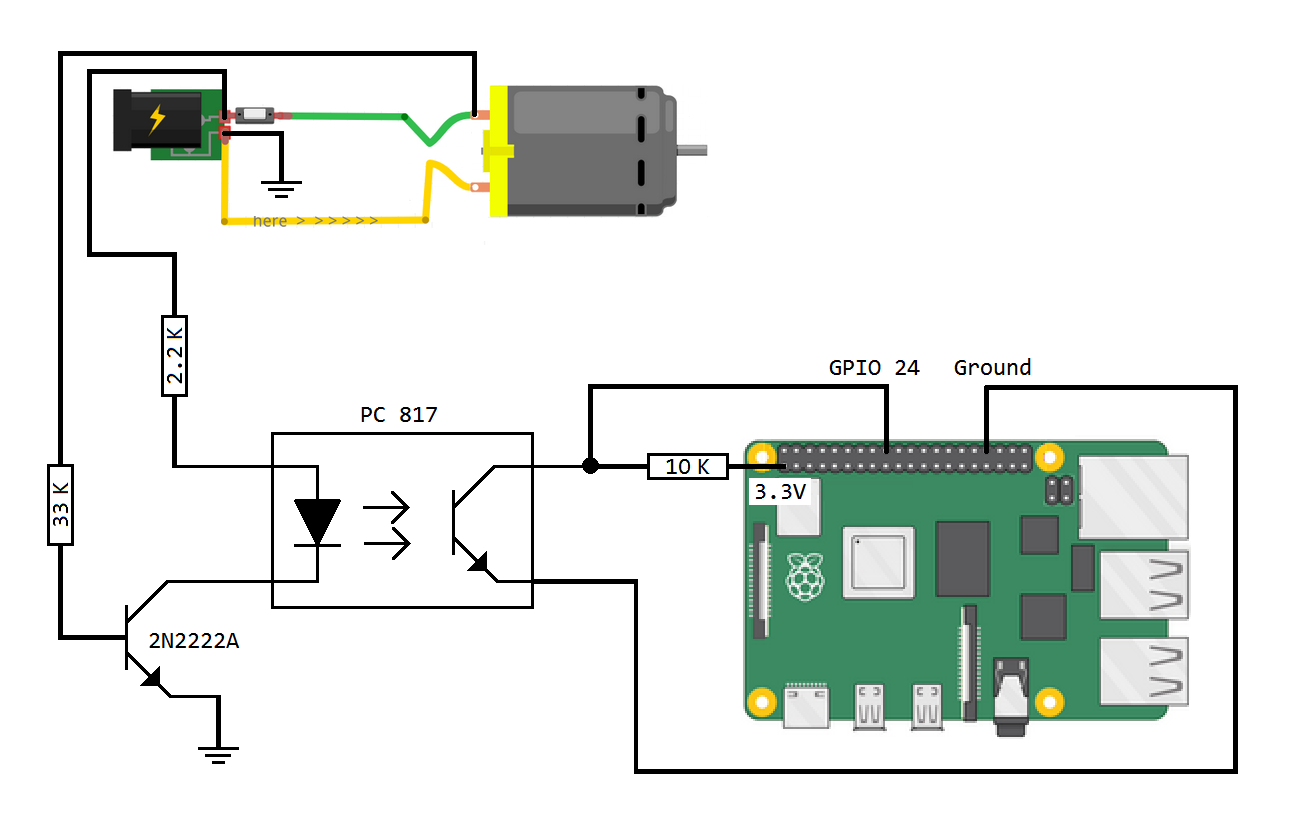
The circuit from the video in the above YouTube link shows how to use the RPi to turn the motor on or off. To detect whether or not the motor is running, the circuit needs to be modified (see the schematic/diagram below). You won't be using the "here > > > > > >" part of the yellow wire (as seen in your question) because that would be measuring current through a series connection which the RPi can't handle. Instead you would measure the potential difference (voltage) across a parallel connection. This is what the GPIO (configured as an input) will measure: a HIGH potential or a LOW one.

Make sure the barrel style DC plug has a positive center. The 33K resistor, which has one end going to the transistor base, will have its other end connected to the green wire in your circuit. This way, when the motor comes on, some current will drive the transistor, allowing current to flow through the opto-coupler's internal LED. It then shines on the receiver, allowing the isolated collector-emitter junction to conduct.

A 10K current limiting resistor connects the 3.3V pin to the GPIO you wish to use to detect if the motor is running. The 10K hardly drops any voltage because the GPIO's input impedance is far greater, so the GPIO sees nearly the entire voltage coming from the 3.3V pin. This ensures that the input always reads a stable HIGH, since the voltage must drop quite a bit before the transition from HIGH to LOW occurs. Grounding the GPIO, as it is presently wired, will pull it down to ground (LOW) while drawing less than 1mA through the 10K resistor (thus protecting the RPi). When opto-coupler conducts, it is connecting the ground and GPIO wires on its terminals. This is how the RPi is able to detect the state of the motor. enter image description here

The circuit from the video in the above YouTube link shows how to use the RPi to turn the motor on or off. To detect whether or not the motor is running, the circuit needs to be modified (see the schematic/diagram below). You won't be using the "here > > > > > >" part of the yellow wire (as seen in your question) because that would be measuring current through a series connection which the RPi can't handle. Instead you would measure the potential difference (voltage) across a parallel connection. This is what the GPIO (configured as an input) will measure: a HIGH potential or a LOW one.

Make sure the barrel style DC plug has a positive center. The 33K resistor, which has one end going to the transistor base, will have its other end connected to the green wire in your circuit. This way, when the motor comes on, some current will drive the transistor, allowing current to flow through the opto-coupler's internal LED. It then shines on the receiver, allowing the isolated collector-emitter junction to conduct.

A 10K current limiting resistor connects the 3.3V pin to the GPIO you wish to use to detect if the motor is running. The 10K hardly drops any voltage because the GPIO's input impedance is far greater, so the GPIO sees nearly the entire voltage coming from the 3.3V pin. This ensures that the input always reads a stable HIGH since the voltage must drop quite a bit before the transition from HIGH to LOW. Grounding the GPIO, as it is presently wired, will pull it down to ground (LOW) while drawing less than 1mA through the 10K resistor (thus protecting the RPi). When opto-coupler conducts, it is connecting the ground and GPIO wires on its terminals. This is how the RPi is able to detect the state of the motor. enter image description here

The circuit from the video in the above YouTube link shows how to use the RPi to turn the motor on or off. To detect whether or not the motor is running, the circuit needs to be modified (see the schematic/diagram below). You won't be using the "here > > > > > >" part of the yellow wire (as seen in your question) because that would be measuring current through a series connection which the RPi can't handle. Instead you would measure the potential difference (voltage) across a parallel connection. This is what the GPIO (configured as an input) will measure: a HIGH potential or a LOW one.

Make sure the barrel style DC plug has a positive center. The 33K resistor, which has one end going to the transistor base, will have its other end connected to the green wire in your circuit. This way, when the motor comes on, some current will drive the transistor, allowing current to flow through the opto-coupler's internal LED. It then shines on the receiver, allowing the isolated collector-emitter junction to conduct.

A 10K current limiting resistor connects the 3.3V pin to the GPIO you wish to use to detect if the motor is running. The 10K hardly drops any voltage because the GPIO's input impedance is far greater, so the GPIO sees nearly the entire voltage coming from the 3.3V pin. This ensures that the input always reads a stable HIGH, since the voltage must drop quite a bit before the transition from HIGH to LOW occurs. Grounding the GPIO, as it is presently wired, will pull it down to ground (LOW) while drawing less than 1mA through the 10K resistor (thus protecting the RPi). When opto-coupler conducts, it is connecting the ground and GPIO wires on its terminals. This is how the RPi is able to detect the state of the motor. enter image description here
updated image to include "12 VDC"
Source Link

The circuit from the video in the above YouTube link shows how to use the RPi to turn the motor on or off. To detect whether or not the motor is running, the circuit needs to be modified (see the schematic/diagram below). You won't be using the "here > > > > > >" part of the yellow wire (as seen in your question) because that would be measuring current through a series connection which the RPi can't handle. Instead you would measure the potential difference (voltage) across a parallel connection. This is what the GPIO (configured as an input) will measure: a HIGH potential or a LOW one.

Make sure the barrel style DC plug has a positive center. The 33K resistor, which has one end going to the transistor base, will have its other end connected to the green wire in your circuit. This way, when the motor comes on, some current will drive the transistor, allowing current to flow through the opto-coupler's internal LED. It then shines on the receiver, allowing the isolated collector-emitter junction to conduct.

A 10K current limiting resistor connects the 3.3V pin to the GPIO you wish to use to detect if the motor is running. The 10K hardly drops any voltage because the GPIO's input impedance is far greater, so the GPIO sees nearly the entire voltage coming from the 3.3V pin. This ensures that the input always reads a stable HIGH since the voltage must drop quite a bit before the transition from HIGH to LOW. Grounding the GPIO, as it is presently wired, will pull it down to ground (LOW) while drawing less than 1mA through the 10K resistor (thus protecting the RPi). When opto-coupler conducts, it is connecting the ground and GPIO wires on its terminals. This is how the RPi is able to detect the state of the motor. enter image description hereenter image description here

The circuit from the video in the above YouTube link shows how to use the RPi to turn the motor on or off. To detect whether or not the motor is running, the circuit needs to be modified (see the schematic/diagram below). You won't be using the "here > > > > > >" part of the yellow wire (as seen in your question) because that would be measuring current through a series connection which the RPi can't handle. Instead you would measure the potential difference (voltage) across a parallel connection. This is what the GPIO (configured as an input) will measure: a HIGH potential or a LOW one.

Make sure the barrel style DC plug has a positive center. The 33K resistor, which has one end going to the transistor base, will have its other end connected to the green wire in your circuit. This way, when the motor comes on, some current will drive the transistor, allowing current to flow through the opto-coupler's internal LED. It then shines on the receiver, allowing the isolated collector-emitter junction to conduct.

A 10K current limiting resistor connects the 3.3V pin to the GPIO you wish to use to detect if the motor is running. The 10K hardly drops any voltage because the GPIO's input impedance is far greater, so the GPIO sees nearly the entire voltage coming from the 3.3V pin. This ensures that the input always reads a stable HIGH since the voltage must drop quite a bit before the transition from HIGH to LOW. Grounding the GPIO, as it is presently wired, will pull it down to ground (LOW) while drawing less than 1mA through the 10K resistor (thus protecting the RPi). When opto-coupler conducts, it is connecting the ground and GPIO wires on its terminals. This is how the RPi is able to detect the state of the motor. enter image description here

The circuit from the video in the above YouTube link shows how to use the RPi to turn the motor on or off. To detect whether or not the motor is running, the circuit needs to be modified (see the schematic/diagram below). You won't be using the "here > > > > > >" part of the yellow wire (as seen in your question) because that would be measuring current through a series connection which the RPi can't handle. Instead you would measure the potential difference (voltage) across a parallel connection. This is what the GPIO (configured as an input) will measure: a HIGH potential or a LOW one.

Make sure the barrel style DC plug has a positive center. The 33K resistor, which has one end going to the transistor base, will have its other end connected to the green wire in your circuit. This way, when the motor comes on, some current will drive the transistor, allowing current to flow through the opto-coupler's internal LED. It then shines on the receiver, allowing the isolated collector-emitter junction to conduct.

A 10K current limiting resistor connects the 3.3V pin to the GPIO you wish to use to detect if the motor is running. The 10K hardly drops any voltage because the GPIO's input impedance is far greater, so the GPIO sees nearly the entire voltage coming from the 3.3V pin. This ensures that the input always reads a stable HIGH since the voltage must drop quite a bit before the transition from HIGH to LOW. Grounding the GPIO, as it is presently wired, will pull it down to ground (LOW) while drawing less than 1mA through the 10K resistor (thus protecting the RPi). When opto-coupler conducts, it is connecting the ground and GPIO wires on its terminals. This is how the RPi is able to detect the state of the motor. enter image description here

added schematic diagram and tried to make the text more concise
Source Link

Just to clarify on the answer by Mats Karlsson, if you are using the opto-couplerThe circuit from the YouTube video, it will have to be modified because in the videoabove YouTube link shows how to use the RPi to turn the motor on or off. To detect whether or not the motor is running, youthe circuit needs to be modified (see the schematic/diagram below). You won't be using the "here > > > > > >" part of the yellow wire (as seen in your question) because that would be measuring current through a series connection which the RPi can't handle. Instead you would be measuringmeasure the potential difference in voltage(voltage) across a parallel connection. This is what the input GPIO (configured as an input) will measure: a HIGH potential or a LOW one.

Assuming your posted circuitMake sure the barrel style DC plug has a positive voltage coming from the center pin terminal of the barrel connector: The 10K. The 33K resistor, which has one end going to the transistor base, will have theits other end connectconnected to the green wire in your circuit. This way, when the motor comes on, some current will drive the transistor to allow, allowing current to flow through the internal LED in the opto-coupler whichcoupler's internal LED. It then shines on the receiver and allows, allowing the isolated collector-emitter junction to conduct.

This would mean that you would not use the resistor, LED, or the 9V supply from the circuit. Instead use a 3.3V pin from the RPi to make use of the isolation a coupler can give you. The whole idea is that no external voltage will be able to reach the GPIOs. The voltage will come from the RPi itself so you're safe as long as you don't draw too much current from your RPi's 3.3V pin.

A current limiting resistor with a value from 10K to 100K connected to the 3.3V pin will draw less than 1mA if it gets grounded. You want this current limiting resistor to go fromconnects the RPi's 3.3V pin to the GPIO you wish to use to detect if the motor is running. This GPIO will also connect to the collector terminal ofThe 10K hardly drops any voltage because the opto-coupler whichGPIO's input impedance is far greater, so the one that used to go toGPIO sees nearly the LEDentire voltage coming from the 3. Then make sure3V pin. This ensures that the old ground connection frominput always reads a stable HIGH since the opto-coupler's emitter terminal only connects withvoltage must drop quite a bit before the RPi's groundtransition from HIGH to LOW.

When Grounding the motorGPIO, as it is runningpresently wired, the transistor will conduct and current will flowpull it down to ground (LOW) while drawing less than 1mA through both sides ofthe 10K resistor (thus protecting the RPi). When opto-coupler conducts, it is connecting the ground and GPIO wires on its terminals. This means that your input GPIO will no longer read a HIGH from the current limiting resistor becauseis how the opto-coupler's collector-emitter junction provides a much easier pathRPi is able to ground. This means thatdetect the GPIO will sit about 0.1 volts above ground which will be read as a LOWstate of the motor. enter image description here

Just to clarify on the answer by Mats Karlsson, if you are using the opto-coupler circuit from the YouTube video, it will have to be modified because the video shows how to use the RPi to turn the motor on or off. To detect whether the motor is running, you won't be using the "here > > > > > >" part of the yellow wire because that would be measuring current through a series connection which the RPi can't handle. Instead you would be measuring the potential difference in voltage across a parallel connection. This is what the input GPIO will measure: a HIGH potential or a LOW one.

Assuming your posted circuit has a positive voltage coming from the center pin terminal of the barrel connector: The 10K resistor, which has one end going to the transistor base, will have the other end connect to the green wire in your circuit. This way, when the motor comes on, some current will drive the transistor to allow current to flow through the internal LED in the opto-coupler which shines on the receiver and allows the isolated collector-emitter junction to conduct.

This would mean that you would not use the resistor, LED, or the 9V supply from the circuit. Instead use a 3.3V pin from the RPi to make use of the isolation a coupler can give you. The whole idea is that no external voltage will be able to reach the GPIOs. The voltage will come from the RPi itself so you're safe as long as you don't draw too much current from your RPi's 3.3V pin.

A current limiting resistor with a value from 10K to 100K connected to the 3.3V pin will draw less than 1mA if it gets grounded. You want this current limiting resistor to go from the RPi's 3.3V pin to the GPIO you wish to use to detect if the motor is running. This GPIO will also connect to the collector terminal of the opto-coupler which is the one that used to go to the LED. Then make sure the old ground connection from the opto-coupler's emitter terminal only connects with the RPi's ground.

When the motor is running, the transistor will conduct and current will flow through both sides of the opto-coupler. This means that your input GPIO will no longer read a HIGH from the current limiting resistor because the opto-coupler's collector-emitter junction provides a much easier path to ground. This means that the GPIO will sit about 0.1 volts above ground which will be read as a LOW.

The circuit from the video in the above YouTube link shows how to use the RPi to turn the motor on or off. To detect whether or not the motor is running, the circuit needs to be modified (see the schematic/diagram below). You won't be using the "here > > > > > >" part of the yellow wire (as seen in your question) because that would be measuring current through a series connection which the RPi can't handle. Instead you would measure the potential difference (voltage) across a parallel connection. This is what the GPIO (configured as an input) will measure: a HIGH potential or a LOW one.

Make sure the barrel style DC plug has a positive center. The 33K resistor, which has one end going to the transistor base, will have its other end connected to the green wire in your circuit. This way, when the motor comes on, some current will drive the transistor, allowing current to flow through the opto-coupler's internal LED. It then shines on the receiver, allowing the isolated collector-emitter junction to conduct.

A 10K current limiting resistor connects the 3.3V pin to the GPIO you wish to use to detect if the motor is running. The 10K hardly drops any voltage because the GPIO's input impedance is far greater, so the GPIO sees nearly the entire voltage coming from the 3.3V pin. This ensures that the input always reads a stable HIGH since the voltage must drop quite a bit before the transition from HIGH to LOW. Grounding the GPIO, as it is presently wired, will pull it down to ground (LOW) while drawing less than 1mA through the 10K resistor (thus protecting the RPi). When opto-coupler conducts, it is connecting the ground and GPIO wires on its terminals. This is how the RPi is able to detect the state of the motor. enter image description here

added 141 characters in body
Source Link
Loading
made clearer
Source Link
Loading
made clearer
Source Link
Loading
Source Link
Loading