6

I want to use my Raspberry Pi to control mains(fans,lamp on 240v). Its very difficult to procure a good and reliable relay board for me in India. After bit of searching, I have decided to go with Seeed Studio's Groove Relay. Here are details:

Specifications:

  • Operating Voltage: 3.3V~5V
  • Max Switching Voltage: 250VAC/30VDC
  • Max Switching Current: 5A

If I understand correctly, opto coupler relays provide isolation. However as this product does not come with opto coupler, how do I add isolation?

  • Is isolation really important between relay & raspberry pi?
  • How do I add isolation between raspberry pi and relay board?
  • Adding ULN2003 between Pi and relay board would solve the problem?
3
  • The "Wiki" gives sod all information. I am not prepared to download a pdf to see what it might do. If you want help extract the detail and include in your question. There is no need for more "isolation" - the relay will provide this. What you need to know is the drive requirements.
    – Milliways
    Commented May 29, 2014 at 10:39
  • I edited the question and removed those links. 'There is no need for more "isolation" - the relay will provide this.' then why there are relays with optocouplers? 'What you need to know is the drive requirements.' you mean how much current/voltage is required to drive the board and turn on/off relays?
    – avi
    Commented May 29, 2014 at 10:48
  • The added info is output of the relay, not what is required to drive it. "Operating Voltage: 3.3V~5V" is OK but what current? If the board has only a relay without any electronics then you will need to provide this. There is no need for optocouplers with a relay, as it inherently provides isolation. I have been designing electronics for 50 years - long before optocouplers. Optocouplers are of value in providing isolation without a relay, especially when the output needs to "float" wrt the input. elinux.org/RPi_GPIO_Interface_Circuits is an excellent guide to interfacing.
    – Milliways
    Commented May 29, 2014 at 12:52

1 Answer 1

6

Relays are pretty safe to use without any special isolation like optocouplers. The reason people recommend optocouplers in DIY projects... well because its DIY and an optocoupler is safer in case of something going wrong.
enter image description here

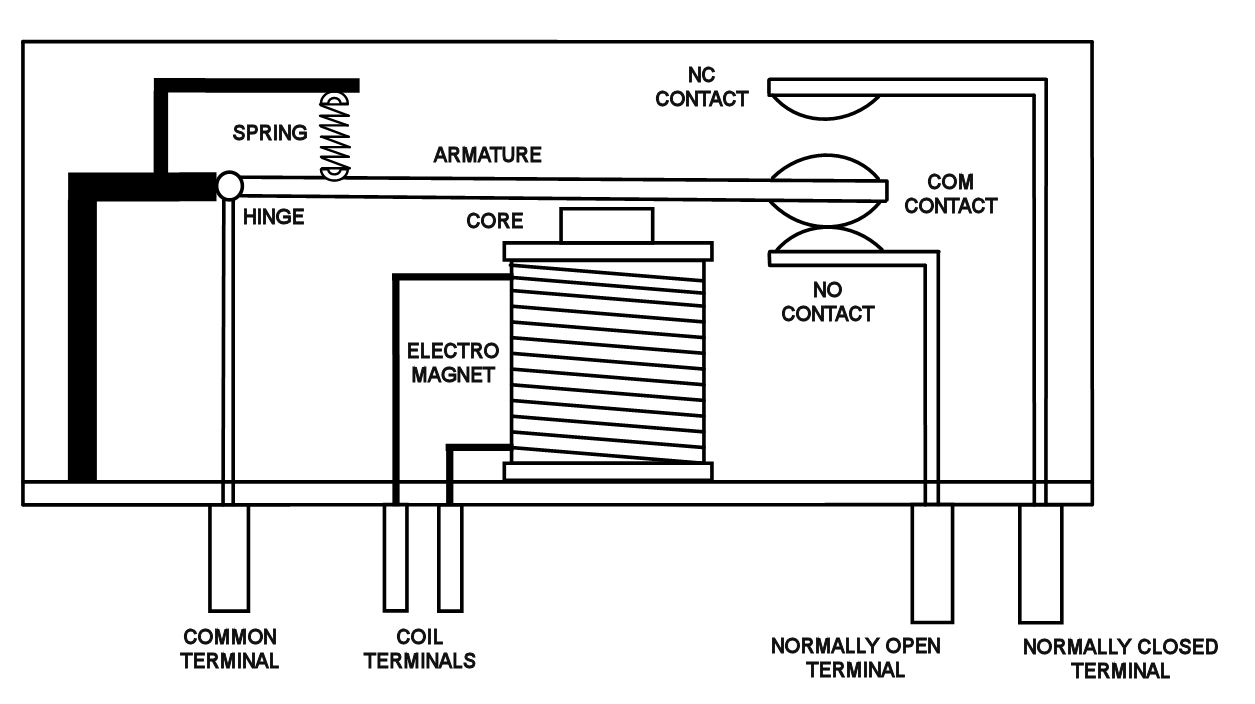
The input pins power a coil and push or pull a lever using some kind of snap hinge to eliminate bounce and sparks. So you are already isolated by air (~1000v per 1mm of air protection). Optocouplers turn on the coil using a light beam on the switch, which help isolate the MCU from flyback EMF, and possible relay short circuit.

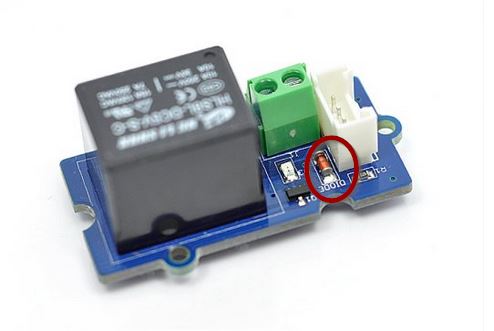
A relay will (or should) have a diode to protect your device from electromagnetic flyback voltages, and the one from Seeed has this built in.
enter image description here

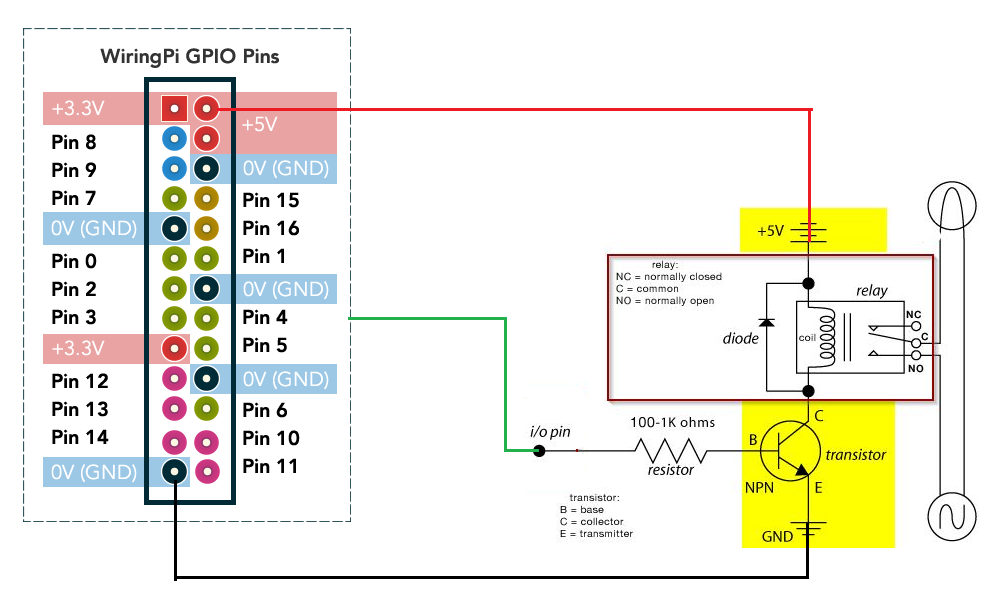
The widely accepted way of driving a relay with a MCU pin is to use a transistor to "switch" GND and power the relay from a separate dedicated power supply/pin instead form the IO.
enter image description here

You would then supply 5Volts into the relay Vcc direct from the 5V apapter that connects to the Raspberry, NOT from the Raspberry itself. The transistor, when you pull up a GPIO will "connect" the GND and the relay will work. Transistor have diodes built in and also also offer other protection to the GPIO. Transistors are well marked and you you can use a variety of them. If anything weird happens with the relay the transistor will blow up saving the MCU in normal environments. The worst case scenario is lightning striking it, then, sadly allot of things break.

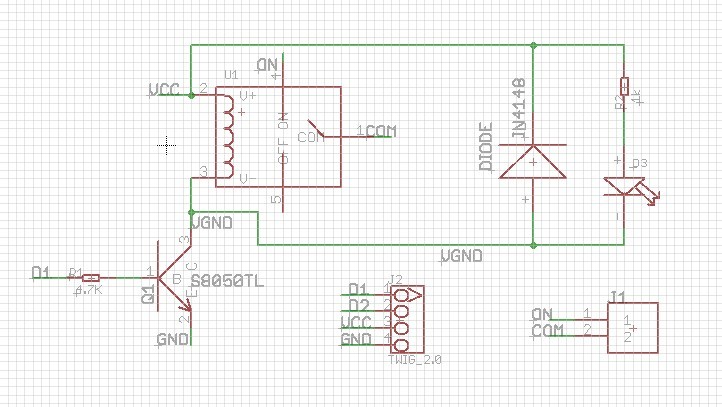
The schematics for the device you pointed out already contain all this circuitry. Isnt that nice of them :) It means you are protected and you just need to connect 3 wires, since all the above is ALREADY on the PCB :) Notice a 4.7K resistor in between D1 and Q1. Q1 is the transistor and you also have an LED show when the relay is active :)

Now just take care when connected 220v to J1 - You run LIVE to the relay. So you switch LIVE on AC and not GND. Do not connect LIVE and NEUTRAL into there.
enter image description here

  • D1 - Connect to Raspberry Pi GPIO PIN
  • D2 - Unused
  • VCC - COnnect to 5V on Pi
  • GND - Connect to GND on Pi
12
  • 2
    The reason a transistor is used is because the coils in the relay usually need a high inrush current. The GPIO might not be able to handle this and it may reset the Pi due to a brown out. Even keeping the relay on uses current and that could strain the GPIO. It would be best to power the relay from the USB before the Pi. We should only use GPIO as logic triggers and not to "power" things. But, yea, you can power the relay from the GPIO if you think the power draw will be OK and nothing will happen and OK for home DIY. But better do it properly for long lasting projects or production.
    – Piotr Kula
    Commented May 29, 2014 at 13:50
  • 1
    Yea. Use the 5V or 3.3V GPIO pin on the PI (dedicated power pin) and connect it to the VCC pin on the relay board. Then connect GND to the transistor as in the diagram. You can use a 1K resistor on the transistor but its not necessary (in DIY) at all if the transistor can sense betwenn 2~5v
    – Piotr Kula
    Commented May 29, 2014 at 13:52
  • 1
    I put in a diagram for you. You can buy cheap transistor on eBay or something, search for P2N2222A - Here is one on sprakfun, well overpriced but you can see what you need. sparkfun.com/products/12852
    – Piotr Kula
    Commented May 29, 2014 at 14:14
  • 1
    If you need even more info.. here is something nice I found while searching for something else.. openhomeautomation.net/…
    – Piotr Kula
    Commented May 29, 2014 at 14:19
  • 2
    Uhhhh. I just found the schematic to the relay... If you buy that one from Seeeeedstudio you dont need to do any of this transistor, resistor or any thing.... because its already on the PCB! Please check the update. I understand schematics might be new to you, but please read those documents and try to understand them too.
    – Piotr Kula
    Commented May 29, 2014 at 14:24

Your Answer

By clicking “Post Your Answer”, you agree to our terms of service and acknowledge you have read our privacy policy.

Not the answer you're looking for? Browse other questions tagged or ask your own question.