11

I've a Pi camera v2 which I'm planning to use with an RPi3 for a computer vision project.

I need to capture full sensor images from the camera - no cropping. The resolution actually used by the software is very low, around 120 x 90 or so (plus or minus a few dozen). The software will acquire a frame, process it, acquire next frame, etc - as fast as possible. The software will be written in Python, with Tensorflow doing image recognition.

Is there a way to do deep binning on the camera directly? I'm trying to avoid image processing in software as much as possible, since all 4 CPU cores will be busy doing other things. So I need to downsample from the full sensor images to the low 120 x 90 resolution with minimal CPU effort. It would be great if the camera could do some really deep binning, like 20 x 20 or so.

If not, what would be a good option in terms of Python libraries to do fast, deep downsampling? BTW, I can't drop pixels, I need all the initial information, so some kind of blending would have to be done.

The software only processes black and white images. Can I set the camera to output b/w images? Again, if not, what would be the fastest way to do that in Python on the RPi3 platform? Any hardware acceleration tricks are very welcome.

The overall goal here is to come up with image acquisition routines that use the whole sensor, downsample, and feed approx 120 x 90 px images, black and white, 8 bit per pixel, probably as a numpy array, to the computer vision part of the software, while using the minimum amount of CPU cycles, in order to maximize the overall speed.

1
  • 1
    Yes you can access the camera layer directly using MMAL code but that is a bit hardcore. But if you use UV4L there is an API available to do stuff with the video stream via v4l2-ctl to set things on the camera that you can then use the /dev/video device directly. I would try that and see how you get on. If you get stuck contact the author about any real problem or question. He is a very nice guy that loves to help out with real problems. Good Luck and please answer with how you solved your problem.
    – Piotr Kula
    Commented Dec 13, 2016 at 8:22

2 Answers 2

19

Let's start by looking at the camera modules themselves. The v1 camera module is capable of 2x2 and 4x4 binning (see the camera modes table); I've heard there's an 8x8 binning mode as well but the firmware devs weren't able to get it working. This is why the v1 module can achieve full field of view (FoV) in most modes.

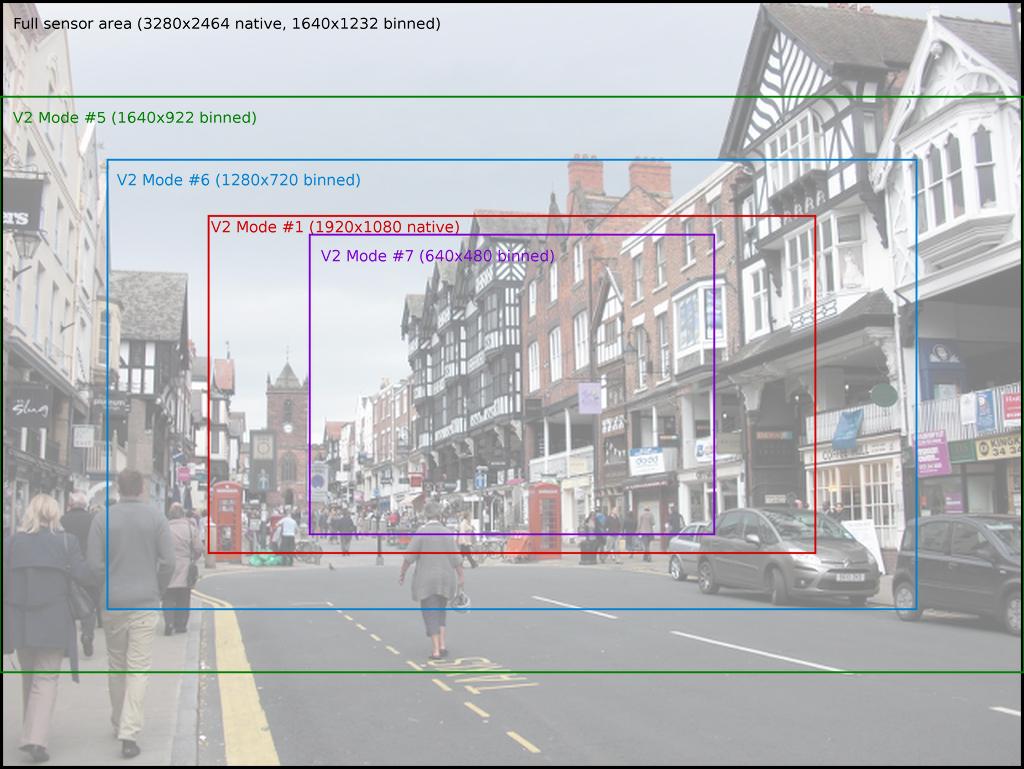
The v2 camera module by comparison, unfortunately, is only capable of 2x2 binning which explains why many of its modes have a partial FoV (I think the v2 module can also do line skipping, but I don't think that's used by the Pi's camera firmware). However, this isn't the whole story. This is only the beginning of the image processing pipeline. In other words, this is just what the sensor itself passes to the ISP block in the GPU which handles the rest of the processing, including any resizing. Whilst the camera has several discrete modes (listed in that table), it can effectively work in any resolution up to the listed maximum. If you read a bit further on from those tables in the documentation, you'll find a description of the heuristic used to select the sensor mode according to the requested resolution and frame-rate.

Provided you either wind up in, or force the use of, a full-frame sensor mode you'll be capturing from all pixels on the sensor anyway. As for concerns about CPU usage: don't worry. The CPU isn't used for any part of the camera's imaging pipeline, it's almost entirely GPU based (except for that first binning step which is done by the sensor ISP). The only time the CPU gets involved is when it receives the final output and has to do something with it.

If you're looking for minimal CPU usage, this is a major plus of the camera module compared to USB webcams which, because the USB bus is polled by the CPU, use significant CPU time (USB3 uses interrupts instead of polling but we're talking about Pis here which only have USB2, and besides: most USB webcams don't use USB3 at the time of writing).

Onto your specific requirements. You want:

  • to produce a 120x90 image
  • with full field of view
  • in black and white (I'll take this to mean luma only is fine)
  • to a Python numpy array
  • as fast as possible

Easy enough. We'll use sensor mode 4 which provides full field of view and uses the sensor to perform an initial 2x2 binning. We'll set the output resolution of the camera to 120x90 (this simply means the GPU's resizing block will take the full-frame 2x2 binned sensor data and downsize it down to 120x90). Finally, we'll capture straight into a numpy array but we'll only make it large enough for the Y (luminance) plane of the data; it'll throw an error because the array's not large enough for all the data, but that's okay - we can ignore that and it'll still write the Y data out:

import time
import picamera
import numpy as np

with picamera.PiCamera(
         sensor_mode=4,
         resolution='120x90',
         framerate=40) as camera:
    time.sleep(2) # let the camera warm up and set gain/white balance
    y_data = np.empty((96, 128), dtype=np.uint8)
    try:
        camera.capture(y_data, 'yuv')
    except IOError:
        pass
    y_data = y_data[:120, :90]
    # y_data now contains the Y-plane only
    print(y_data.max())

This is more or less copied straight from the Unencoded image capture (YUV) recipe which also explains why we're actually capturing 128x96 here (the camera works in 32x16 blocks).

What about rapid continual capture? I'm assuming you're interested in this simply because you want this as fast as possible (which generally means you want as many as possible as well). In this case it's best to use a custom output with a YUV recording (which will receive one write() call per frame), then use numpy's very handy frombuffer method to layer a numpy array on top of the front of the captured data (note: this is extremely fast because we're not allocating the numpy array or copying the data, we're just saying "make a numpy array on this existing block of memory"):

import time
import picamera
import numpy as np

class MyOutput(object):
    def write(self, buf):
        # write will be called once for each frame of output. buf is a bytes
        # object containing the frame data in YUV420 format; we can construct a
        # numpy array on top of the Y plane of this data quite easily:
        y_data = np.frombuffer(
            buf, dtype=np.uint8, count=128*96).reshape((96, 128))
        # do whatever you want with the frame data here... I'm just going to
        # print the maximum pixel brightness:
        print(y_data[:90, :120].max())

    def flush(self):
        # this will be called at the end of the recording; do whatever you want
        # here
        pass

with picamera.PiCamera(
        sensor_mode=4,
        resolution='120x90',
        framerate=40) as camera:
    time.sleep(2) # let the camera warm up and set gain/white balance
    output = MyOutput()
    camera.start_recording(output, 'yuv')
    camera.wait_recording(10) # record 10 seconds worth of data
    camera.stop_recording()

Despite producing 40 frames per second of image data in numpy arrays, the CPU usage of this script is minimal. Comment out the print statement, which is actually quite CPU heavy, to see the overall CPU usage: it's about 2% on my Pi3 so there's plenty left over for whatever image processing you want to do.

9
  • Thank you so much Dave, your answers are always great! This is EXACTLY what I need. The image size is not set in stone, I'll try to find the maximum size that allows the rest of the .py code (Tensorflow) to do image recognition at a good enough pace on the Pi3; I just need full sensor data for a decent view angle. I'm still self-debating whether the whole thing will be one loop (capture / image recog / react), or I should have two separate units (capture like in your 2nd example in one process, and share numpys async with Tensorflow process). #1 is easier, #2 is faster. Need to think about it. Commented Dec 14, 2016 at 19:07
  • 1
    BTW, the info in this answer is so useful, it should be added to the picamera module documentation somewhere. At least the first half of the answer. I had no idea how all that processing was done on the GPU, etc. Maybe the camera documentation itself should mention this stuff in a tech details blurb somewhere. The way the camera works and integrates with the RPi platform and the software is a lot better than I thought. Commented Dec 14, 2016 at 19:10
  • 1
    I've been fleshing out the camera hardware chapter for the next release but I should probably add in a bit about it all being implemented in the GPU - I just take that knowledge for granted but reading the docs it isn't obvious at all.
    – Dave Jones
    Commented Dec 14, 2016 at 21:11
  • @DaveJones your first example throws some errors. Here's the fixed code: gist.github.com/FlorinAndrei/281662a59dec0d3cbb902cb3be6d79f6 Commented Dec 18, 2016 at 9:44
  • Ah, I think you're using python 2 which imposes the one dimensional buffer requirement - that doesn't apply on python 3 so you can skip the reshape step
    – Dave Jones
    Commented Dec 18, 2016 at 10:43
5

Pi camera v2 is a particularily bad choice for what you're trying to do. Take a look at its supported resolutions list:

enter image description here

As you can see, the smallest supported resolution is 640×480, and it's already cropped compared to full sensor area.

There's Orange Pi camera you might take into consideration, which has similar size and supports resolutions down to 320×240. Not exactly what you need (albeit closer), but I don't know if you're able to switch your project to a different SBC easily.

My advice however would be to buy a cheap USB webcam which supports CIF resolutions, expecially SQCIF (128×96). You can find out which resolution a webcam supports by running v4l2-ctl --list-formats-ext.

Finally, if you need big FOV, consider buying a webcam with 180° lens (so-called Fisheye). If you don't care about Full HD, there are fisheye webcams out there for as little as $30. Taking 640×480 images with 180° FOV and cutting a 120×90 region will result in the effective FOV of about 33°.

4
  • 2
    Those are the native sensor modes of the camera, but you can capture at any resolution at all; the GPU will handle down-sampling the image to any requested resolution. I'll write up a more complete answer in a mo, but I'm afraid this interpretation is just plain wrong.
    – Dave Jones
    Commented Dec 14, 2016 at 9:25
  • @DaveJones Me being wrong is indeed very possible. Still, I find it a bit wasteful to buy a 5MP camera to capture 120×90 pictures, so I'd still suggest to buy a cheap webcam. Also, there should be a price to pay for this GPU processing (video overlay? framebuffer memory?) Commented Dec 14, 2016 at 9:40
  • 2
    There's no CPU price for the video overlay (it doesn't use the framebuffer at all - just draws straight on the HDMI/composite out so Linux isn't even aware of the camera preview - that's one of the reasons you can't easily "stick it in a window"). Obviously it does use a certain amount of GPU power but generally that's not a concern (except for the obvious if you're running your Pi on batteries :)
    – Dave Jones
    Commented Dec 14, 2016 at 13:07
  • 2
    I should also explain why I called your interpretation "wrong": the modes listed aren't the "supported resolutions". In fact, if you try v4l2-ctl --list-formats-ext with the pi camera module's V4L2 driver loaded (sudo modprobe bcm2835-v4l2) you'll see it lists a load of modes with "Size: Stepwise 32x32 - 2592x1944 with step 2/2" (thats from a v1 module). That means it supports literally any resolution from 32x32 up to 2592x1944 in steps of 2x2; the firmware will do its best to maximize FoV for the selected res, but naturally there are limits to that.
    – Dave Jones
    Commented Dec 14, 2016 at 13:14

Your Answer

By clicking “Post Your Answer”, you agree to our terms of service and acknowledge you have read our privacy policy.

Not the answer you're looking for? Browse other questions tagged or ask your own question.