Even though my SD card is 16GB, the image I flashed onto it was only 2GB and now I can only see 2GB of storage space on the disk.
How can I resize the image so that I have more space on my root partition?
Assuming you are using Debian.
First make a backup of your SD Card using the instructions found here in case something goes wrong.
From the command line or a terminal window enter the following
sudo fdisk /dev/mmcblk0
then type p to list the partition table
you should see three partitions. if you look in the last column labeled System you should have
make a note of the start number for partiton 2, you will need this later. though it will likely still be on the screen (just in case).
next type d to delete a partition.
You will then be prompted for the number of the partition you want to delete. In the case above you want to delete both the Linux and Linux swap partitions.
So type 2
then type d again and then type 3 to delete the swap partition.
Now you can resize the main partition.
type n to create a new partition.
This new partition needs to be a primary partition so type p.
Next enter 2 when prompted for a partition number.
You will now be prompted for the first sector for the new partition. Enter the start number from the earlier step (the Linux partition)
Next you will be prompted for the last sector you can just hit enter to accept the default which will utilize the remaining disk space.
Type w to save the changes you have made.
Next reboot the system with the following command:
sudo reboot
once the system has reboot and you are back at the commandline enter the following command:
sudo resize2fs /dev/mmcblk0p2
Note: this can take a long time (depending on the card size and speed) be patient and let it finish so you do not mess up the file system and have to start from scratch.
Once it is done reboot the system with the following command:
sudo reboot
You can now verify that the system is using the full capacity of the SD Card by entering the following command:
df -h
The real magic here is that you delete the root and swap partitions, then recreate only the root partition (using the original start sector) before writing the data to the disk. As a result you don't erase the existing data from the root partition.
By removing the swap partition you allow the root partition room to grow beyond its current size and fill the unused portion of the disk (because of the placement of the partitions -the root partition is sandwiched between the boot and swap partitions - it can't simply be resized leaving the swap partition alone).
You then resize (which is safe to run on a mounted disk) the file system to use all the space in the new root partition.
ref:
Using the Debian-Wheezy Beta image, there is a configuration utility built in that makes this easy:
There is a utility called raspi-config. This runs on first boot if you're connected directly to the RPi. If you're over SSH you can run it manually using $ sudo raspi-config. (I think you can re-run the tool manually at any time).
The second option on the blue dialog that follows is titled expand_rootfs, with the description "Expand root partition to fill SD card".
Selecting this will cause your root partition to be resized to fill the card the next time you boot your RPi.
Update for 2015!
I'm coming back to this answer with a note of caution: I have been using a bunch of 16GB SD cards, and I got caught out by maxxing my partition to fill the card I was using. Doing so caused a bunch of problems when switching to a new card which (even though it was stated as 16GB) was about 200MB smaller than the older card.
This came to a head when I switched a couple of RPis from v1 to the new v2 model, which uses Micro SD cards.
I now leave about 1GB free to make absolutely sure that my images can be switched between SD cards without issue.
If you are not very comfortable working on the command line, like in Steve Robillards excellent answer, there are some GUI applications available. In particular gparted works very well.
I think it's installed by default on a Ubuntu LiveCD but not on an installed system. There is of course an easy fix for this: apt-get install gparted. You can't do this on the actual Pi, because to resize partitions they need to be unmounted.
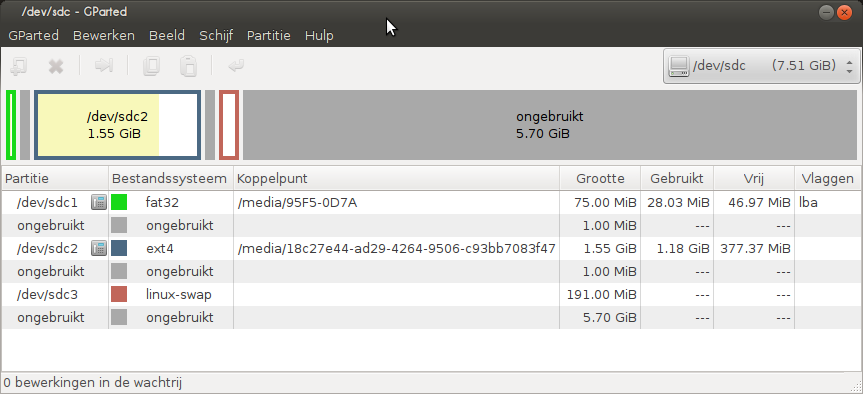
The picture below is in Dutch, but don't let that spoil the fun. It's very easy to use. This is the layout of the default debian image on a 8gb sdcard.

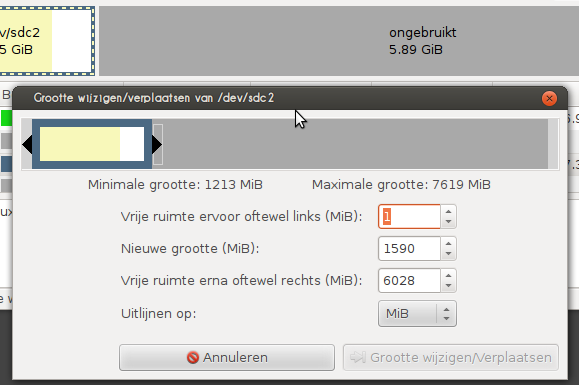
Right-click the partions to unmount them and then right-click to resize or move the partition. You can also create new partitions and format existing ones. In the picture below I've removed the swap partition and now I'm able to resize the root partition to the entire space on the right of it. Don't fill it entirely, because you still have to add a swap partition.

You can play with the partition layout, changes are only written if you apply the changes (the grayed out 'return' key in the first picture).
It's very easy to move partitions but like in Steve's answer I'd recommend you remove the swap partition entirely, then resize the root and then recreate a swap. Moving a partition can take a very long time and the swap does not contain data you need to keep.
gparted if you're running under Wayland (not sure these issues have been resolved): xhost +SI:localuser:root
Commented
Mar 15, 2019 at 0:14
If you use the newer Debian Wheezy image: http://www.raspberrypi.org/archives/1435 A boot-time script allows you to resize to fill the sdcard automatically.
I followed this video and it worked perfectly for me (I have a 16GB card):
/mnt/storagefor example. This effectively isolates system and data and makes it easier to maintain and backup./mnt/storage, if you want programs - mount at/opt/software/.