164

I have a Raspberry Pi model B at home, but I do not have a screen. My plan is to connect it to the Ethernet and then ssh into it. But this means that the SD card with the operating system (Debian Squeeze) has to be prepared first. I see two ways:

  1. Prepare the SD with the OS such that the RPi always connects to the Ethernet under a fixed IP address and enables an SSH server.

  2. Prepare the SD with the OS such that the RPi connects to the network, enables an SSH server and then broadcasts its IP address so that I can ssh into it.

Which of these ways is easier? And how do I do it? Are there other ways?

I have the following tools: Ubuntu 10.4, MacOS 10.5, Windows 7, but only the Ubuntu has a cardreader. Unfortunately I cannot access my router's DHCP table, it is completely closed.

11
  • 5
    Useful aside - RasPi doesn't naturally boot (Debian, at least) with SSH enabled. You need to modify a file in /boot/ that has SSH in its name to boot. I know this doesn't answer your question but it may be the next stumbling block :) Jun 12, 2012 at 20:47
  • 1
    I do not feel this is worthy of being an answer but you could try a port scanning tool. Jun 13, 2012 at 11:04
  • 11
    @iampearce: In the debian wheezy beta, ssh does now appear to be enabled by default. Jul 5, 2012 at 11:11
  • 5
    The current wheezy has SSH enabled per default. If you have a DHCP server in your network, it will work out of the box.
    – Sentry
    Oct 15, 2012 at 11:56
  • 1
    There are already all the answers you need I guess. I just wanted to add my way of searching the Pis in my network. I usually have more than one, and even more machines with port 22 open. nmap -sP 192.168.0.0/24 | grep Pi -B 2
    – cee
    Jun 26, 2014 at 20:26

16 Answers 16

70

To enable ssh at startup, backup boot.rc on the boot partition on the SD image and replace it with boot_enable_ssh.rc

I don't know about your router, but you may be able to configure it to reserve a fixed IP address for the MAC address of your Pi.

12
  • 3
    Is ssh already installed on the Debian Squeeze image supplied by the foundation?
    – Till B
    Jun 13, 2012 at 11:37
  • 1
    @TillB, it is installed in the supplied image, but it must be started manually.
    – finnw
    Jun 13, 2012 at 16:29
  • 1
    ok, which is the boot partition? I have one that contains the file system, one swap partition and one that contains the start.elf file and others. There is also the boot_enable_ssh.rc, but no boot.rc. I renamed it to boot.rc and booted. I find the RPi in the network (at least I assume that it is the Pi), but ssh is closed.
    – Till B
    Jun 14, 2012 at 17:12
  • 1
    Are you sure it's that way round. Mine works by renaming TO boot.rc, as found in raspberrypi.stackexchange.com/questions/606/… Jun 23, 2012 at 10:24
  • 5
    I booted the 2012-09-18-wheezy-raspbian.img image on a new headless Raspberry Pi, it autostarted sshd and configured itself using DHCP.
    – nos
    Sep 29, 2012 at 13:51
54
  1. Copy boot_enable_ssh.rc to boot.rc from /boot in the Raspberry Pi's rootfs (SD card)

  2. Still in the Raspberry Pi's rootfs, edit /etc/network/interfaces in order to have a fixed IP address assigned (so no DHCP server is needed). For example,

    auto lo eth0
    iface lo inet loopback
    iface eth0 inet static
        address 192.168.0.202
        netmask 255.255.255.0
        gateway 192.168.0.200
    
  3. Boot your Raspberry Pi, use an Ethernet cable to connect it to the same network that your PC is connected to (or connect it directly to your PC) and login via SSH:

    ssh [email protected]
    
  4. Install a light VNC server in your Raspberry Pi:

    sudo apt-get install tightvncserver
    
  5. Then start the VNC server (you'll be asked to set a password):

    vncserver :1 -name RasPi -depth 16 -geometry 1024x768
    
  6. Install a VNC client in your PC:

    apt-get install xtightvncviewer
    
  7. Then connect to your Raspberry Pi via VNC from your PC:

    xtightvncviewer 192.168.0.202:1
    

It just works here in that way :)

2
  • 2
    FWIW: OP asked about ssh - not about X or VNC.
    – Brad
    Mar 14, 2014 at 17:32
  • i have used raspberrypi_defconfig configuration under BUILDROOT to mount the OS on the pi ... There is no boot.rc file in boot folder !!! what can i do ?
    – The Beast
    Jan 24, 2016 at 13:08
36

None of the boot_enable_ssh.rc stuff exists in current Raspian builds. You boot, a nice graphical menu gives you some options (including whether SSHD should load at boot) and then dumps you out on a command line.

That's great if... you're a graphical user.

If you're not, you're left in the position where you have to somehow externally run update-rc.d. All this really does is create a symlink to the /etc/init.d/... script at various points in the /etc/rc{0..6}.d/... filesystem. Confused? Never mind — doing the damage is simple.

  1. I'm assuming you're doing this from a Linux computer. At least something using bash, or something compatible. What I'm suggesting will not work from Windows without Cygwin (or other). Mount the SD card and cd into it.

  2. Run:

    for i in 2 3 4 5; do sudo ln -s /etc/init.d/ssh etc/rc$i.d/S02ssh; done
    
  3. Unmount, and boot. You should have access to it over SSH.

If you're struggling to find it on your network...

Three options for you:

  • Use your router's admin to find it. Netgear is especially good at showing "Attached Devices".

  • Plug a monitor in and run ifconfig (cheating!)

  • Use nmap on another computer to scan for it. You should know what IP it roughly has (to a /24) so scanning is simple:

     sudo nmap -sV --open 192.168.0.0/24  -p22
    
11
  • 1
    Don't use nmap for this, you can ping the broadcast address and check the ARP table. Nov 29, 2012 at 23:22
  • @TomWijsman Do you mean running ping -b 192.168.0 or an equivalent? I'm not sure how viable this as I've just tested this on two routers without success. Seems to be commonly blocked.
    – Oli
    Nov 30, 2012 at 0:04
  • 1
    @Oli: No, it's your kernel that is not gathering all ARP replies, it's considered a waste to check every incoming packet to see if its MAC is already in the ARP cache which is why this doesn't always work on Linux, if only I knew how to configure this; but this for instance works just fine on Windows and Mac OS X... Nov 30, 2012 at 0:25
  • @Oli: A viable alternative if your system can't do this is arping; it does what the separate ping and arp commands would impose, but then without flooding the network with ICMP packets. Nov 30, 2012 at 0:28
  • 2
    @nornagon: arp -a does not do this on its own. Nov 30, 2012 at 6:44
21

If you use Arch Linux distribution, you just plug it in and wait for it to get its address assigned from a DHCP server. You can then check the DHCP's status (by connecting to your router for example) and retrieve the IP address from connected clients list. If that fails, you can use nmap or similar tools to scan the entire subnet for open port 22 (SSH is enabled by default).

4
  • oh, forgot to add: I can't access my router (it is supplied by my company and completely closed). Are you saying that on Arch ssh is always enabled? How about Debian?
    – Till B
    Jun 12, 2012 at 20:55
  • I think that only Arch comes with SSHd pre-enabled.
    – user13
    Jun 12, 2012 at 20:56
  • 5
    Debian does not have SSH enabled by default. Jun 12, 2012 at 21:29
  • 4
    So far every distro I have installed on my Pi has had SSH enabled by default. Not saying this is always the case, but it has been for me. Jun 27, 2012 at 12:52
17

Following massive botnet attacks in 2016 due to IoT devices being easily hacked with default passwords, Raspbian once again comes with SSH turned off by default (source).

The fix is pretty easy, you just need to create a file in the boot partition (not the directory within the root filesystem) called ssh. To check if you're in the right partition, it should have a file named start.elf.

Don't forget to change your password after!

To find my Pi on my network I used sudo arp-scan -l, though sudo nmap -sS --open -O 192.168.1.0/24 is also a valid, but slower, option.

2
  • Your posting mentioned to create a file names "start.elf", while the source URL mentioned to create a file names "SSH" see: 'If you want to enable SSH, all you need to do is to put a file called ssh in the /boot/ directory.' can you review the posting?
    – BastianW
    Feb 5, 2017 at 15:03
  • Oops, I was a little hasty when writing the answer, thanks for identifying that point of confusion
    – raphael
    Feb 5, 2017 at 16:23
13

Using the Debian 7 (Wheezy) beta image, SSH is installed and enabled by default. You just need to connect to it via its IP address.

There are a few ways to work out what IP address the Raspberry Pi is on without having to run ifconfig on it directly, for example:

  • Your router configuration pages may have a screen stating IP addresses for machines connected
  • Most smartphones have free Wi-Fi network scanners that will show devices connected to a network.
4
  • It is not enabled on MY Debian Wheezy image by default... :(
    – Matt
    Oct 31, 2012 at 14:03
  • @Matt: Are you sure? - the standard one I downloaded way back when had it turned on. Oct 31, 2012 at 14:17
  • I think so. I just tried it again this morning (with the latest image). Maybe I missed something, but I remember doing this a couple times now.
    – Matt
    Oct 31, 2012 at 14:27
  • Doesn't seem to apply in 2017
    – raphael
    Feb 3, 2017 at 3:18
11

The easy way (if you have just a keyboard)

SSH is not enabled by default in Debian Wheezy (Raspbian). Once upon a time, SSH was definitely not enabled on my Raspbian images. Apparently SSH is enabled by default now. But if it's not and you're stuck, read on:

Enabling it is very simple, a lot simpler than most of the answers I've seen here, if you have a USB keyboard:

  1. Plug in the keyboard and boot the RPi. Note the default keyboard layout will be the standard QWERTY US layout, so mind your "Y"s and "Z"s, and your "-"s and "/"s.
  2. Wait a minute, then type "pi", hit Enter, then "raspberry", and hit enter.
  3. Enable SSH with:

    sudo /etc/init.d/ssh start
    
  4. Type the password "raspberry" again just in case, since it's a sudo command, and hit Enter.

You should now be able to remote into your RPi by its IP address on your network.

As Denis Mitropolskiy mentioned, the configuration utility makes it easy to configure SSH at this point:

sudo raspi-config

Just go to the "ssh" option. Fortunately, this works in an SSH session, so the only command you need to run "blindly" is the first one above.

9
  • 1
    Awesome answer, however it looks ssh might be enabled on the more recent SD cards tht ship with the Pi. Ordered mine last week and ssh just worked out the box!
    – pufferfish
    Nov 9, 2012 at 14:46
  • They ship with SD cards now? Where did you order yours? That's good news, though. I was thinking of upgrading to the B model.
    – Matt
    Nov 9, 2012 at 15:06
  • 4
    Just a comment to this blind solution: I don't have "native" english keyboard (it is slovenian!), so without raspi-config or dpkg-reconfigure keyboard-configuration my USB keyboard sends 'z' instead of 'y', which does affect blind password login. Similar problem can also persist on other non-english keyboards! You can check default english characters in Windows when switching your keyboard/Language bar settings from 'your language'->'EN' in taskbar.
    – TomiL
    Oct 16, 2013 at 17:09
  • 3
    @TomiL: good point. On German keyboards 'Z' and 'Y' are also swapped. Jul 6, 2014 at 18:51
  • 1
    This works best now, Latest Raspbian jessie has ssh enabled by default with username/password pi/raspberry
    – redDevil
    Jul 21, 2016 at 18:54
5

Can't say whether or not SSH works out of the box, but the latest configuration utility version has "Enable SSH" command. After that I was able to connect to my Raspberry via network . But to enable it you need a monitor anyway.

1
  • 1
    This is basically the easiest way. You don't even need a monitor to enable it if you have a keyboard. It only takes one command which you can run blindly.
    – Matt
    Oct 31, 2012 at 14:19
5

One caveat: With Arch Linux, this worked for me only if I had Ethernet hooked up before booting the Raspberry Pi (and then it worked fine: sshd was enabled by default). If I first boot, then connect the Ethernet cable, the Raspberry Pi never contacts the DHCP server to get an IP address.

4

No router + no screen + regular Ethernet cable + RPI 2 + Raspbian Lite 2018-11-13 + Ubuntu 18.10 host

First we must enable the SSH server on the Pi, which is disabled by default for security.

If you already have a shell on the Pi through a non-SSH method such as screen + keyboard or UART (see below), just run:

sudo systemctl enable ssh
sudo service sshd start

as explained at: SSH not working with fresh install This persists across boots.

Otherwise, insert he SD card on your host, and create a magic empty file named ssh file in the boot/ partition.

On Ubuntu hosts, it gets mounted automatically and you can do just:

sudo touch /media/$USER/boot/ssh

which you can confirm with:

lsblk

which contains:

mmcblk0     179:0    0  14.4G  0 disk
├─mmcblk0p1 179:1    0  43.9M  0 part /media/ciro/boot
└─mmcblk0p2 179:2    0  14.4G  0 part /media/ciro/rootfs

If you don't enable the SSHD daemon on the Pi then SSH connection will fail with:

ssh: connect to host 10.42.0.160 port 22: Connection refused

when we try it later on.

After enabling the SSH server

Next, boot the Pi, and link an Ethernet cable from your laptop directly to the Pi:

enter image description here

On Ubuntu 17.04 to work around this bug as mentioned on this answer you first need:

sudo apt-get install dnsmasq-base

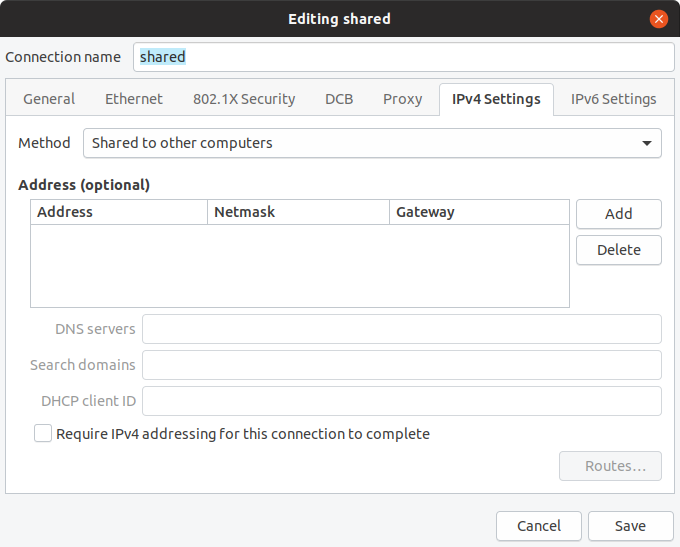
On the host, open the network manager:

nm-connection-editor

And go:

  1. + sign (Add a new connection)
  2. Ethernet
  3. Create
  4. IPv4 Settings
  5. Method: Shared to other computers
  6. Set a good name for it
  7. Save

enter image description here

Find the IP of the Pi on host:

cat /var/lib/misc/dnsmasq.leases

outputs something like:

1532204957 b8:27:eb:0c:1f:69 10.42.0.160 raspberrypi 01:b8:27:eb:0c:1f:69

10.42.0.160 is the IP, then as usual:

ssh [email protected]

I also have the following in my .bashrc:

piip() ( cat /var/lib/misc/dnsmasq.leases | cut -d ' ' -f 3; )
pissh() ( sshpass -p raspberry ssh "pi@$(piip)"; )

From inside the Pi, notice that it can access the internet normally through your host's other interfaces:

ping google.com

For example on my laptop, the Pi takes up the Ethernet, but the host is also connected to the internet through WiFi.

The crossover cable is not required if the host network card supports Auto MDI-X. This is the case for most recent hardware, including for example the 2012 Lenovo T430 I tested with, which has an "Intel® 82579LM Gigabit Network Connection" which documents support for Auto MDI-X.

Now you can also:

UART serial USB converter

This is an alternative to SSH if you just want to get a shell on the Pi: https://en.wikipedia.org/wiki/Serial_port

This does not use SSH or networking itself, but rather the older, simpler, more direct, more reliable, lower bandwidth, lower distance serial interface. The Pi won't have access to the Internet with this method.

Desktop computers still have a serial port which you can connect directly wire to wire with the Pi, but these are hidden in most laptops, and so we need to buy a cheap USB adapter. Here I've used: https://www.amazon.co.uk/gp/product/B072K3Z3TL See also: https://unix.stackexchange.com/questions/307390/what-is-the-difference-between-ttys0-ttyusb0-and-ttyama0-in-linux/367882#367882

First plug the SD card on the host, and edit the config.txt file present in the first partition to add:

enable_uart=1

as explained at: https://www.raspberrypi.org/forums/viewtopic.php?f=28&t=141195

This first partition contains the bootloader, its configuration files and the (Linux / your) kernel, config.txt being one of them. The second partition contains the actual Linux root filesystem.

Now connect your computer to the Pi as:

enter image description here

You only need to attach 3 cables:

  • Ground to Ground
  • Tx on Pi to Rx on the USB to serial port
  • Rx on Pi to Tx on tye USB to serial port

This is also documented at: https://www.raspberrypi.org/documentation/usage/gpio/README.md

Be careful not to link the Ground to the 5V, I've already burned 2 UART to USB chips by doing that!

You don't need to connect the 5V to the 5V at all. I think you can power your Pi like that, but I've read that this is a bad idea, just use the usual USB power source.

Finally, plug the USB side of the connector to your host computer, and get a shell with:

sudo apt install screen
sudo usermod -a -G dialout $USER
screen /dev/ttyUSB0 115200

Exit with Ctrl-A \.

Here is a video by Adafruit showing it: https://www.youtube.com/watch?v=zUBPeoLW16Q

3

If you use Debian, then it's quite easy if you can lend a screen and network for your RPi for just some minutes from a friend. If not, you could just test the commands for 'nmap' and 'ssh' from your Ubuntu host.

Just check that the package openssh-server are installed, and you are up and going. You do that from the command line with aptitude install openssh-server. You could also check or rename the RPi when your are logged into the machine. You could also check that the package avahi-utils and avahi-daemon are installed, just try aptitude install avahi-utils.

The avahi package/program will implement Apples protocoll mDNS/DNS-SD which will announce itself to other computers that uses that protocoll as a computer in the DNS domain local. So if your machine is called rpi-machine, try to connect to the machine with rpi-machine.local.

You could check in the file /etc/nsswitch.conf to see if you have this line there:

hosts:          files mdns4_minimal [NOTFOUND=return] dns mdns4

Both your Apple and Ubuntu machine should implement this. Your MS Windows 7 machine doesn't do that though. On the Ubuntu machine you could try this command:

avahi-browse --all

or

avahi-browse _ssh._tcp

You should then get all your machines and their services, like SSH and HTTP listed.

You could also try to install the package nmap in your Ubuntu machine. Then can you check which net you are on with the command ip route list to see which IP-net you are on. For example on my machine I could get something like this (this is from example.com, so don't use it):

192.0.43.0/24 dev eth0  proto kernel  scope link  src 192.0.43.1  metric 1

tells me that I am on net 192.0.43.0/24 and the router are 192.0.43.1. So if you run the command nmap 192.0.43.0/24 will try to find all machines in your net and tell which ports are open. Look for port 22/tcp, as that are the ssh servers.

3

I did manage to setup my Raspberry PI without Screen or Keyboard using the following steps:

  1. Download the latest image of debian-pi/raspbian-ua-netinst. The current one is raspbian-ua-netinst-v1.0.7.img.bz2. The downloaded file is only about 17 MB.

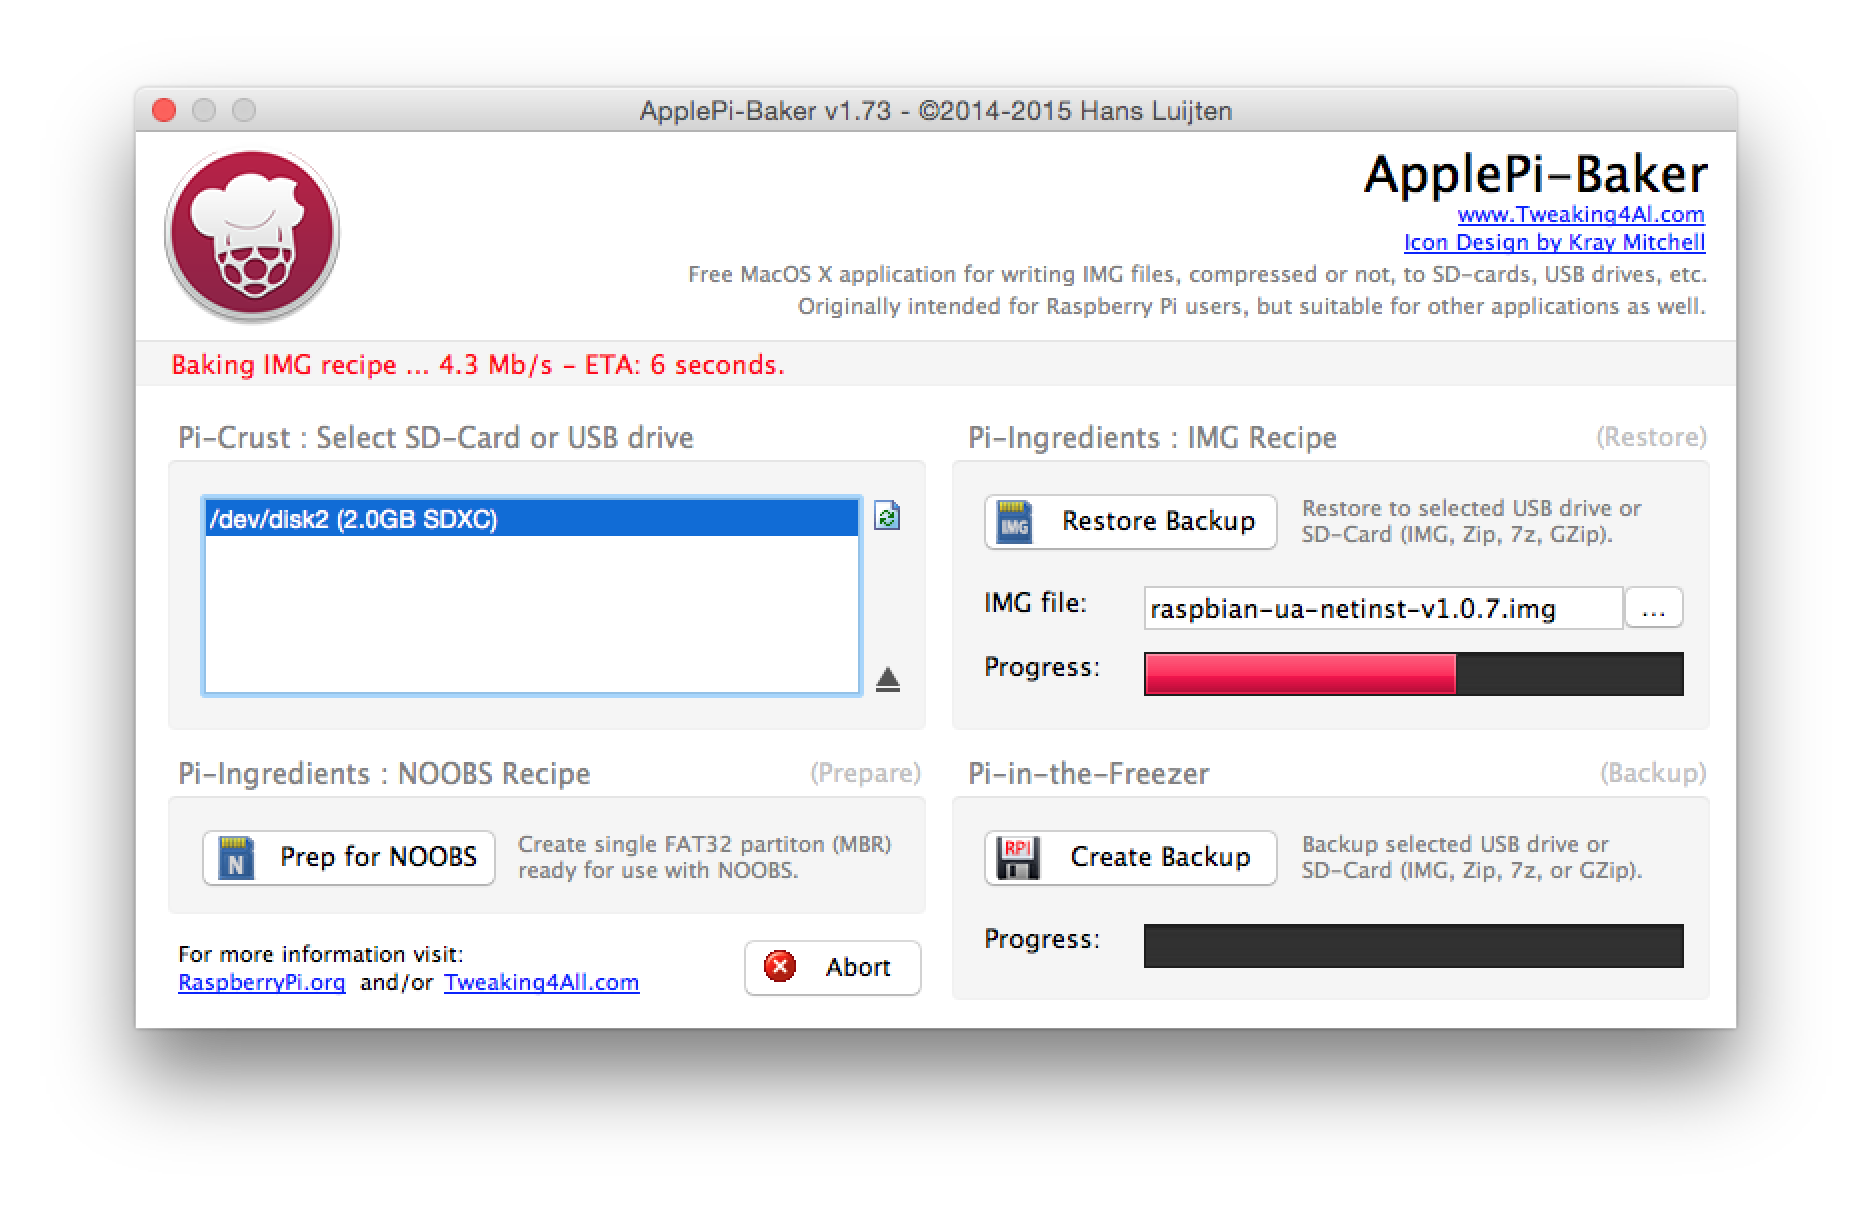
  2. Download the "Apple Pi Baker App" and use this software to transfer the image onto your SD Card

    ApplePiBaker

  3. Insert the SD Card into your PI and after approx 15 Minutes the latest Raspbian will be installed.

  4. Using the Fing iPhone App I discovered the IP of the PI, which is in my case 192.168.1.13.

    IP

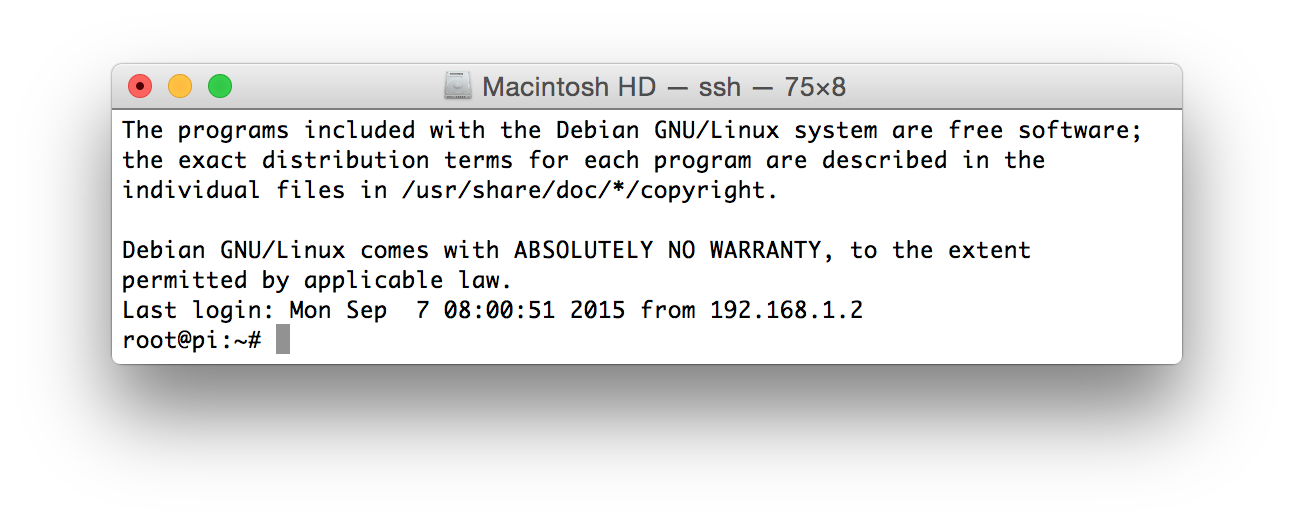
  5. Now I can SSH to that IP like so:

    # Password = raspbian
    ssh [email protected] 
    

And Voila I have access through SSH without doing tedious configuration.

FYI: raspbian-ua-netinst offers more advanced configuration, so check out the Readme if you want to adjust some of those initial settings.

ssh access

3

Since I had some other Pis that I could connect to, I cheated.

I took the Micro SD card out of the Pi that would not let me connect, and put it in a USB reader on one of the working Pis.

I then mounted it to a test folder (sudo mount /dev/sda2 /mnt/test), then chroot /mnt/test to treat it as the new shell.

I then enabled SSH with systemctl enable ssh. Took the card out after unmounting it, booted the Pi, then the SSH port was opened and accessible.

Works on Debian, I'm sure on other systemd style systems as well.

2

One of the best ways to connect after the initial configuration is to get avahi-daemon up and running on the Raspberry Pi.

Once you have installed the avahi-daemon on the Raspberry Pi and Bonjour on the host computer, you can simply log in using raspberrypi.local as the hostname. So there is no need for configuring the IP address, either static or dynamic.

To install avahi-daemon on Raspberry Pi:

sudo apt-get update
sudo apt-get install libnss-mdns

And if you have iTunes installed on the host computer, then just enter raspberrypi.local in PuTTY, else install Bonjour from here. Check this tutorial for more information.

2

You might want to give the raspbian-ua-netinst a try: you can find it by clicking here It's the minimal Raspbian unattended netinstaller for Raspberry Pi Models 1B, 1B+ and 2B. No screen or keyboard required. They have an excellent installation manual in the README.md.

Essentially, you just FAT-format an SD-card. Unzip the latest stable release onto it and insert the SD-card into your Raspberry Pi. It takes about 20 to 30 minutes to install a minimum Raspbian installation and then you're good to go. Comes with SSH installed by default. There are some options that allow you to install additional packages and stuff during the initial install. You can also add packages later, obviously.

2

For Raspbian, I found this tutorial very useful. After performing the steps described in it, I was able to SSH from my Windows 10 laptop to my Raspberry PI with user pi and password raspberry.

More specifically, here is the relevant part:

  • Ensure the Raspberry Pi is powered off, and remove the SD-Card.

  • Insert the SD-Card into a card reader and plug it into your laptop.

  • Find the drive and you should find several files on the Card (note it a lot smaller than you’d expect since it is only the boot section of the Card (the rest is hidden)).

  • Make a copy of cmdline.txt and rename it cmdline.normal

  • Edit cmdline.txt and add the IP address at the end (be sure you don’t add any extra lines).

For network settings where the IP address is obtained automatically, use an address in the range 169.254.X.X (169.254.0.0 – 169.254.255.255):

ip=169.254.0.2

For network settings where the IP address is fixed, use an address which matches the laptop/computers address except the last digit.

ip=192.168.0.2

Ensure you take note of this IP address (you will need it every time you want to directly connect to the Raspberry Pi).

  • Make new copy of cmdline.txt and rename it cmdline.direct

  • To swap between configurations, just replace cmdline.txt with either cmdline.normal or cmdline.direct (or use the commands in Option 2 to do it directly on the Raspberry Pi – the change will take effect next time you power up)

  • Return the card to the Raspberry Pi. Attach the network cable attached to both the computer and Raspberry Pi and power up.

NOTE THE FOLLOWING:

  • You will need to wait for your computer to finish detecting the network settings (you may see a small networking icon flashing in your system tray while it does, or open up the network settings to see when it has finished and has an IP address) – it can take around 1/2 minute. Your computer may report the connection as “limited or no connection” when connected to the Raspberry Pi in this way, this is normal as indicates it is a direct computer to computer connection rather than a standard network.

  • If you forget or decide not to plug in the network cable, the Raspberry Pi will wait 2 minutes (or until you connect the cable) before completing it’s start-up (so if you only have a keyboard and monitor attached, you need to wait!).

  • If you are using multiple wired network adaptors (i.e. Using an extra USB-LAN dongle) on your computer you may find you have to unplug the other network cable and reattach afterwards (my Windows XP machine needed this before it would connect through the direct link).

Not the answer you're looking for? Browse other questions tagged or ask your own question.