2

I would like to connect such a 7-segment 4-digits display (with common anode) to the Raspberry Pi:
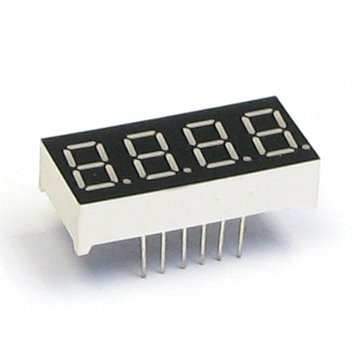
enter image description here

What's the simplest way to do it with Python for example? Do I need the RPi.GPIO package? Is there a high-level way to display some numbers? i.e. just like this:

SegmentDisplay.Print(23)  # will display "0023"

instead of low-level programming like:

GPIO.output(17, True)    # manually select which LED segments to display 
GPIO.output(18, True)    # ...
...
3
  • If nothing is really possible directly with such a simple 4-digit display, is there a solution with a I2C 4-digit display : adafruit.com/products/878 ?
    – Basj
    Commented Mar 25, 2015 at 7:27
  • What color is the display and what if any numbers are on it? Commented Mar 25, 2015 at 22:44
  • So no real solution to work with this non-I2C display?? So sad...
    – Basj
    Commented Mar 31, 2015 at 14:27

4 Answers 4

4
+50

There is no simple solution for a raw display like you linked to. That requires multiplexing which requires constant processing to maintain the display. Perhaps with a threaded library you could make something acceptable but I don't know if something like that exists.

As an alternative you could use the Adafruit LCD display with I2C interface. Adafruit has a tutorial for using it with the Raspberry Pi and has a Python library on github that seems to be what you want.

It even has example code.

9
  • 1
    Thanks, that might be the best indeed. Do you know where we can find this Adafruit display in Europe? (importing from Adafruit USA is so expensive and long shipping!)
    – Basj
    Commented Mar 25, 2015 at 17:27
  • Hmmm, look at this. They refer to the Arduino, which I think uses 5V logic, but in the specs it says "unregulated", which I presume means you could use 3.3V for it. I know the Adafruit things like this allow you to use 5V power but 3.3V logic. I'm no electronics guru but there are a few around here, so you might want to ask a specific question about that or on EE. Found by searching i2c 7-segment Europe, BTW.
    – goldilocks
    Commented Mar 25, 2015 at 18:42
  • Actually if you look toward the bottom here the supply voltage is 2.4 - 5.5V so I think you are almost certainly good to go with that.
    – goldilocks
    Commented Mar 25, 2015 at 18:45
  • Thanks @goldilocks ! This module seems great. It is a SparkFun part (I think they have the schematics on GitHub). Do you know how to interface it from Python? Will it be the same that the Arduino tutorial?
    – Basj
    Commented Mar 25, 2015 at 20:16
  • I'm not really a python user, but you would probably want to use the smbus library to interface with I2C. I am sure with a combination of experimentation and deduction from the sparkfun github docs/code it could be worked out, it looks pretty straightforward. If you have not done something like this before it may seem a bit daunting at first. You have to get a feel for how the communication works.
    – goldilocks
    Commented Mar 25, 2015 at 20:31
1

This example does not use Python but covers a lot of good points.

12
  • Very interesting, thanks! I'm still hoping there is a high-level Python library that allows to do that :) (instead of low-level lighting some LEDs on/off)
    – Basj
    Commented Mar 24, 2015 at 22:36
  • Just one problem : Any down-sides? Well the overhead of keeping the display updated is between 15 and 20% of the CPU usage on my Pi! ... There surely should be a nicer solution, don't you think so ?
    – Basj
    Commented Mar 24, 2015 at 22:38
  • @Basj Wow. 20% CPU usage for keeping a display updated. I'm genuinely surprised. Are you running an RPI or RPI2? Commented Mar 25, 2015 at 18:13
  • @Joseph That's from the author. The issue is probably that there evidently needs to be a 60/s loop "to prevent flicker". Doing this completely in userland with python is inevitably going to be at the "inefficient" end of the spectrum. And there are more than a dozen wires involved -- looks like an interesting learning/development experience! But if you just want a segmented display attached I'd try hard and see if you can get an I2C one from somewhere.
    – goldilocks
    Commented Mar 25, 2015 at 18:35
  • @goldilocks any idea about this raw 7segment display ? I just received it now after weeks of waiting from the seller :) Do you think it's going to be impossible to wire it to the Pi without using 20% of the CPU? Why is it so? Is it such a time-consuming task to light a few LEDs?
    – Basj
    Commented Mar 31, 2015 at 14:29
1

These two pages may help:

They don't contain the code you exactly want, but they are the best I could find.

0

Worth mentioning - if you don't find a suitable package that interfaces with it, it's more than feasible to just write your own.

Just define your own SegmentDisplay.Print(int) function, which parses the number (I heavily suggest using integer division and modulo to find each digit!) and toggling each GPIO pin to match the number. It might be a bit of tedious work at the start, but it would allow you to recycle code from project to project, as well as help simplify your code down the line.

7
  • I could go that way of course (it shouldn't be too difficult to display digit by selecting the right LEDs!). But before trying: 1) How are the pins routed? I see 12 pins on this display, and there are at least 7 * 4 = 28 segments / LEDs to be set on/off. How is done the multiplexing? 2) Do you think it will be heavy for CPU to light all these LEDs ? Does it need continuous action to keep a LED on?
    – Basj
    Commented Apr 1, 2015 at 14:36
  • @Basj 1) According to the image that comes with the eBay listing you've posted, it seems like all four digits share the same 8 pins to light the individual LEDs on the digit. The other four pins on the piece simply select which digit to be lighting. You'll want to not only set the 8 per-digit LEDs the way you want, but also set the three digits you're not trying to set to HIGH output to prevent electrons from flowing through that digit, and the one you're setting to LOW output to bring electrons in.
    – sctjkc01
    Commented Apr 1, 2015 at 14:43
  • @Basj 2) It looks like you'll need to cycle through all four digits on each call to your new SegmentDisplay.Print(int) method, but also need to call that new method 60 times per second - you might be able to get away with fewer if you're okay with flickering. Because you're using Python, I can imagine it being a bit of a CPU suck.
    – sctjkc01
    Commented Apr 1, 2015 at 14:45
  • So this means we need lots of realtime action to always keep the right digits on or off? Impossible to set some LEDs on, and then wait without doing anything?
    – Basj
    Commented Apr 1, 2015 at 14:46
  • @Basj - yes, that is indeed what you'll need to do. You might be able to get away with keeping one single digit on and letting the CPU sleep, but if you're using two digits or more, you'll need to flick between the digits rapidly enough to fool the human eye... which means CPU time.
    – sctjkc01
    Commented Apr 1, 2015 at 14:48

Your Answer

By clicking “Post Your Answer”, you agree to our terms of service and acknowledge you have read our privacy policy.

Not the answer you're looking for? Browse other questions tagged or ask your own question.