5

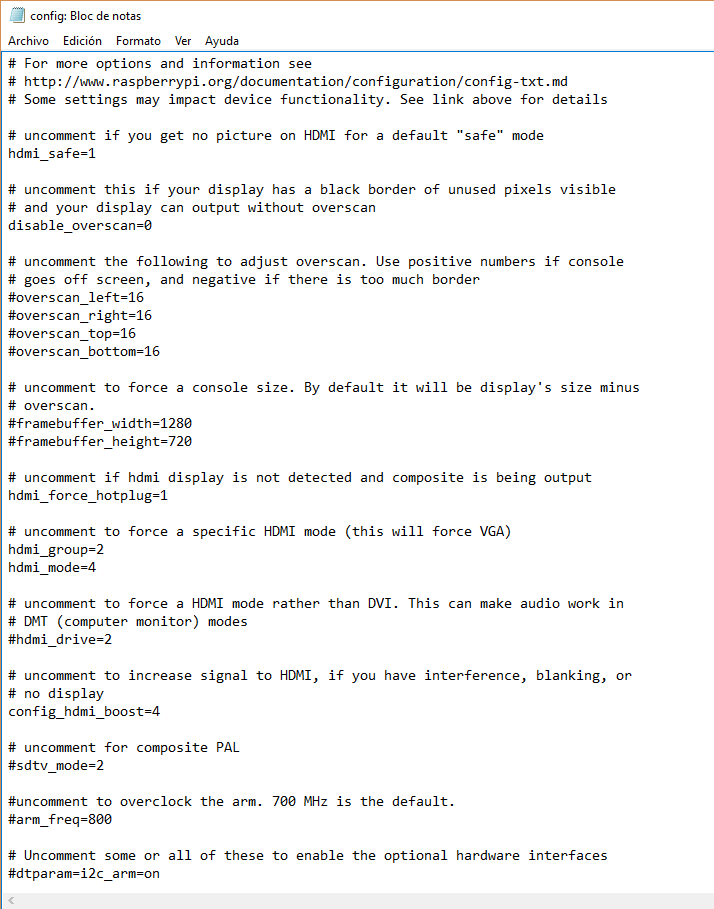
I have raspberry pi 3 model b and windows 10 PC. I downloaded Raspbian instead of NOOBS in order to be able to modify the config.txt file. But I'm still having the same problem, that my display doesn't show anything (The HDMI cable and the display work). Here is a screenshot of my config.txt enter image description here

Any suggestions? Thanks.

3
  • 1
    Have you tried using a different display and HDMI cable? How are you powering the Pi? Have you tried a fresh install of Raspbian? How did you image the OS onto your SD card?
    – Darth Vader
    Commented Jan 7, 2017 at 15:33
  • 1
    Are you sure the system is booting? What does the green ACT led (right next to the red one) do when the Pi is plugged in?
    – goldilocks
    Commented Jan 7, 2017 at 15:48
  • Please don't post images of text, instead paste the text direct into the question.
    – Ingo
    Commented Feb 14, 2019 at 12:17

6 Answers 6

1

Create a /boot/config.txt like this

# dummy config.txt

Yes. I really do mean with one single comment line. Leave all of the other stuff out, we can add things back in later if we need them.

The config.txt on my RPi Zero (that I'm looking at right now has)

dtparam=audio=on
gpu_mem=64
dtparam=act_led_activelow=on
enable_uart=1
dtoverlay=i2c-sensor,bmp180
dtparam=spi=on
dtparam=i2c_arm=on
disable_splash=1

with nothing to control the HDMI output in there.

Boot the system with that and your RPi and your TV/DVI monitor will exchange EDID data. That tells the RPi what your TV/monitor is capable of and which mode is preferred. It also tells the TV what modes the RPi can support.

In 99.99% of cases that EDID exchange protocol results in everything working. That's assuming you've got a working TV, a working RPi (that's booted) and a working HDMI cable.

Once it works take a look at what you've got with tvservice -s, tvservice -m CEA and tvservice -m DMT. The -s option tells you what mode was selected as preferred.

If tvservice -s gives you

state 0x40001 [NTSC 4:3], 720x480 @ 60.00Hz, interlaced

then your RPi has failed to detect any HDMI device.

If you get nothing you need to look at a couple of things:

  1. Is the RPi booted OK.
  2. Is the HDMI cable OK.

To be sure it's booted can you see your RPi on your network? Look on your router's config pages at http://192.168.1.1 or http://192.168.1.254 (you can find that address on Windows with an ipconfig /all command - look for your Default Gateway . . address.
0

Make a backup of your original file then try the "safe mode".

hdmi_force_hotplug=1,
hdmi_ignore_edid=0xa5000080,
config_hdmi_boost=4, 
hdmi_group=2, 
hdmi_mode=4, 
disable_overscan=0, 
overscan_left=24, 
overscan_right=24, 
overscan_top=24, 
overscan_bottom=24
1
0

Go back to the original config.txt file (in case something is messed up, the original should work) and make sure your Raspberry Pi boots correctly (eg. hardwire it to your network and see if it shows up in your router).

I had similar problems when I wanted to connect my Raspberry Pi to my display for the first time. Eventually, it worked without changing any settings. After some testing, I think the display needs to be actively looking for HDMI devices while you boot the Raspberry Pi.

  • When I turn on my display too early (until 10 seconds before I turn on the Raspberry Pi), it goes into some kind of sleep / standby mode, which doesn't seem to work.
  • When I turn on my screen too late (after turning on the Raspberry Pi) it also doesn't work.

TLDR: for me the trick was to turn on the display right before I turned on my Raspberry Pi.

0

Can you confirm the PI is booting correctly, i.e. can you e.g. ssh to your PI?

I did have similar issues in the past where I would boot my PI and then turn on a display or projector. The display or projector would show 'no HDMI signal'.

Let's assume your PI is powering up correctly (otherwise, your question is a bootquestion rather than a HDMI question), then please put back the original config.txt file and check the settings of your PI with the command

tvservice -s

you should now see how your PI is configured (something like: state 0x12000a [HDMI CEA (4) RGB lim 16:9], 1280x720 @ 60.00Hz, progressive) Next, you can change the resolution settings in configuration menu

sudo raspi-config

go to advanced options and then resolution; this should allow you to change the resolution to one that matches your display (you can always check the resolution by connecting the display to your Windows PC and check the working resolutions here). Save changes and reboot.

With this changes, your resolution will be set correctly, and it doesn't matter anymore if you e.g. power your PI first and power your display afterwards.

Also, in case cable length is long (typically 15m or beyond), you might have to increase the signal strength in the config.txt file in the boot directory.

0

I found that the HDMI plug in to the RPi ZERO was not secure.

I took it out and put it in again firmly - it then worked fine.

I have the ZERO on my window, using the Camera, with the cables hanging down now but its 100% successful and hasn't fallen off for a long time!

The normal HDMI to mii HDMI adaptor was not very tight.

Hope that solves it ;-)

Appleman

0

i think you screwed up your config.txt file here is another - from a pi3 - close enough to default for normal operation:

# For more options and information see
# http://www.raspberrypi.org/documentation/configuration/config-txt.md
# Some settings may impact device functionality. See link above for details

# uncomment if you get no picture on HDMI for a default "safe" mode
#hdmi_safe=1

# uncomment this if your display has a black border of unused pixels visible
# and your display can output without overscan
#disable_overscan=1

# uncomment the following to adjust overscan. Use positive numbers if console
# goes off screen, and negative if there is too much border
#overscan_left=16
#overscan_right=16
#overscan_top=16
#overscan_bottom=16

# uncomment to force a console size. By default it will be display's size minus
# overscan.
#framebuffer_width=1280
#framebuffer_height=720

# uncomment if hdmi display is not detected and composite is being output
#hdmi_force_hotplug=1

# uncomment to force a specific HDMI mode (this will force VGA)
#hdmi_group=1
#hdmi_mode=1

# uncomment to force a HDMI mode rather than DVI. This can make audio work in
# DMT (computer monitor) modes
#hdmi_drive=2

# uncomment to increase signal to HDMI, if you have interference, blanking, or
# no display
#config_hdmi_boost=4

# uncomment for composite PAL
#sdtv_mode=2

#uncomment to overclock the arm. 700 MHz is the default.
#arm_freq=800

# Uncomment some or all of these to enable the optional hardware interfaces
dtparam=i2c_arm=on
#dtparam=i2s=on
dtparam=spi=on

# Uncomment this to enable the lirc-rpi module
#dtoverlay=lirc-rpi

# Additional overlays and parameters are documented /boot/overlays/README

# Enable audio (loads snd_bcm2835)
dtparam=audio=on

Your Answer

By clicking “Post Your Answer”, you agree to our terms of service and acknowledge you have read our privacy policy.

Not the answer you're looking for? Browse other questions tagged or ask your own question.