No router + no screen + regular Ethernet cable + RPI 2 + Raspbian Lite 2018-11-13 + Ubuntu 18.10
First we must enable the SSH server on the Pi, which is disabled by default for security.
If you already have a shell on the Pi through a non-SSH method such as screen + keyboard or UART (see below), just run:
sudo systemctl enable ssh
sudo service sshd start
as explained at: SSH not working with fresh install This persists across boots.
Otherwise, insert he SD card on your host, and create a magic empty file named ssh file in the boot/ partition.
On Ubuntu hosts, it gets mounted automatically and you can do just:
sudo touch /media/$USER/boot/ssh
which you can confirm with:
lsblk
which contains:
mmcblk0     179:0    0  14.4G  0 disk
├─mmcblk0p1 179:1    0  43.9M  0 part /media/ciro/boot
└─mmcblk0p2 179:2    0  14.4G  0 part /media/ciro/rootfs
If you don't enable the SSHD daemon on the Pi then SSH connection will fail with:
ssh: connect to host 10.42.0.160 port 22: Connection refused
when we try it later on.
After enabling the SSH server
Next, boot the Pi, and link an Ethernet cable from your laptop directly to the Pi:

On Ubuntu 17.04 to work around this bug as mentioned on this answer you first need:
sudo apt-get install dnsmasq-base
On the host, open the network manager:
nm-connection-editor
And go:
+ sign (Add a new connection)- Ethernet
- Create
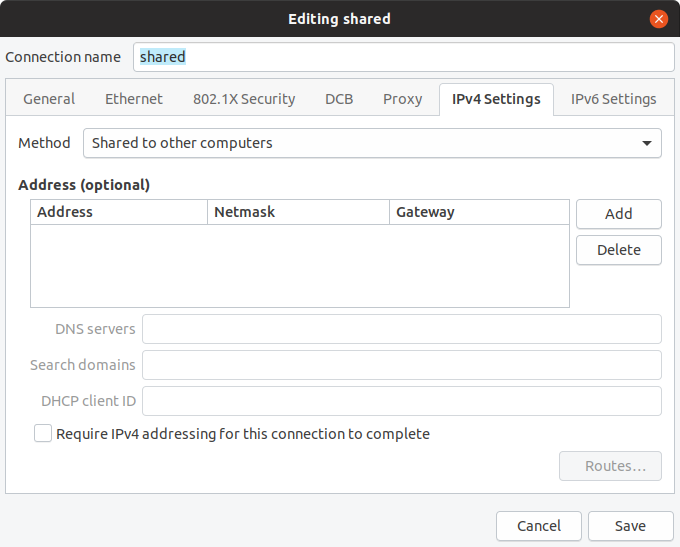
- IPv4 Settings
- Method: Shared to other computers
- Set a good name for it
- Save

Find the IP of the Pi on host:
cat /var/lib/misc/dnsmasq.leases
On Ubuntu 23.10 it is insteaad:
sudo bash -c 'tail -n+1 /var/lib/NetworkManager/*.leases'
See also: https://askubuntu.com/questions/219609/how-do-i-show-active-dhcp-leases
These output something like:
1532204957 b8:27:eb:0c:1f:69 10.42.0.160 raspberrypi 01:b8:27:eb:0c:1f:69
10.42.0.160 is the IP, then as usual:
ssh [email protected]
I also have the following in my .bashrc:
piip() ( cat /var/lib/misc/dnsmasq.leases | cut -d ' ' -f 3; )
pissh() ( sshpass -p raspberry ssh "pi@$(piip)"; )
From inside the Pi, notice that it can access the internet normally through your host's other interfaces:
ping google.com
For example on my laptop, the Pi takes up the Ethernet, but the host is also connected to the internet through WiFi.
The crossover cable is not required if the host network card supports Auto MDI-X. This is the case for most recent hardware, including for example the 2012 Lenovo T430 I tested with, which has an "Intel® 82579LM Gigabit Network Connection" which documents support for Auto MDI-X.
Now you can also:
UART serial USB converter
This is an alternative to SSH if you just want to get a shell on the Pi: https://en.wikipedia.org/wiki/Serial_port
This does not use SSH or networking itself, but rather the older, simpler, more direct, more reliable, lower bandwidth, lower distance serial interface. The Pi won't have access to the Internet with this method.
Desktop computers still have a serial port which you can connect directly wire to wire with the Pi, but these are hidden in most laptops, and so we need to buy a cheap USB adapter. Here I've used a "DSD TECH USB to TTL Serial Converter CP2102": https://www.amazon.co.uk/gp/product/B072K3Z3TL See also: https://unix.stackexchange.com/questions/307390/what-is-the-difference-between-ttys0-ttyusb0-and-ttyama0-in-linux/367882#367882
First plug the SD card on the host, and edit the config.txt file present in the first partition to add:
enable_uart=1
as explained at: https://www.raspberrypi.org/forums/viewtopic.php?f=28&t=141195
This first partition contains the bootloader, its configuration files and the (Linux / your) kernel, config.txt being one of them. The second partition contains the actual Linux root filesystem.
Now connect your computer to the Pi as:

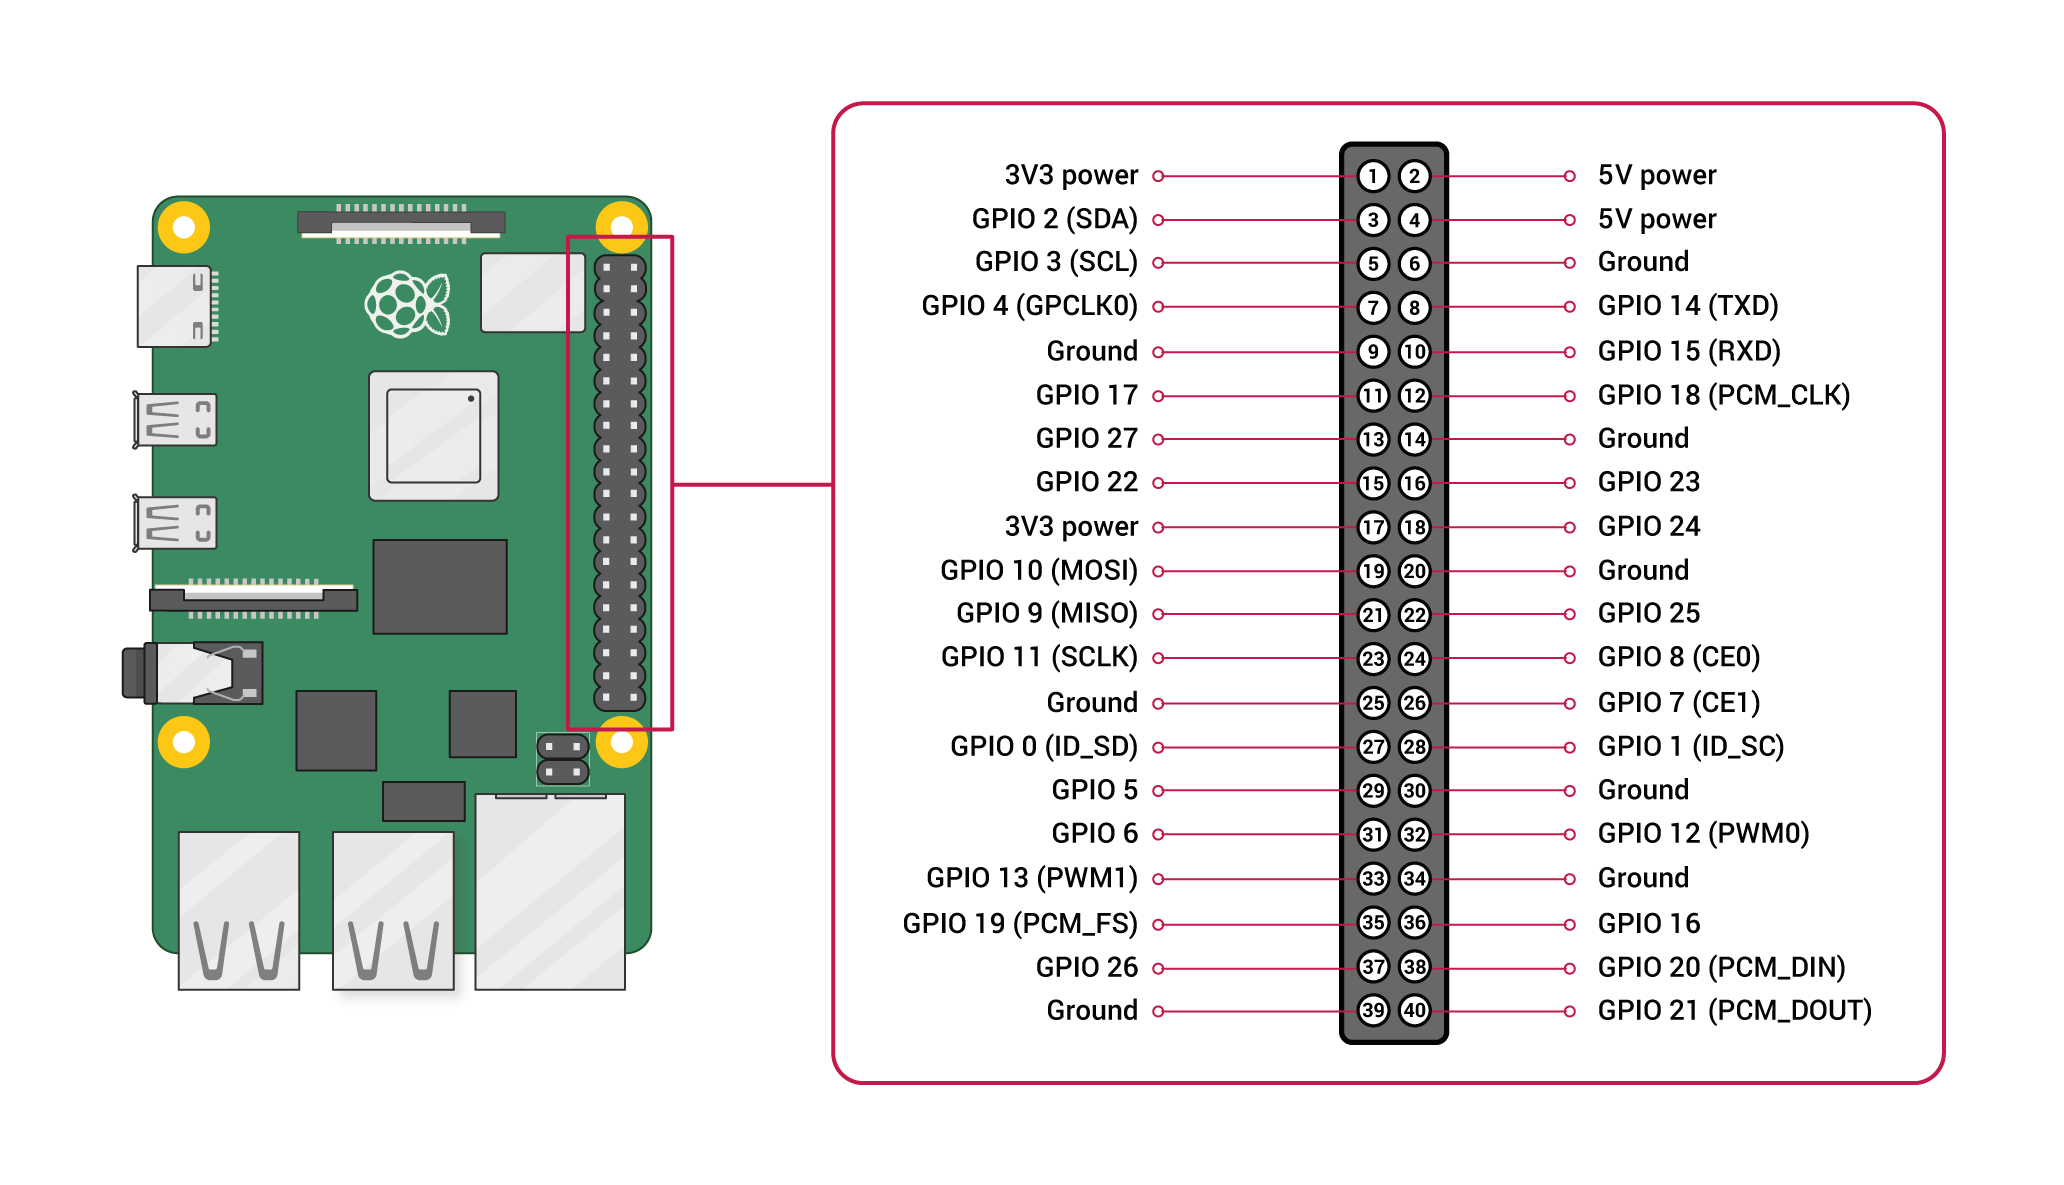
You only need to attach 3 jump wires:
- Ground to Ground
- Tx on Pi to Rx on the USB to serial port
- Rx on Pi to Tx on tye USB to serial port
But if you have 4 ump wires laying around, you can also connect the VCC port which then allows you to also power the PI through the USB, this way you only need to plug one thing into the Pi and it starts running, which is very handy.
This is also documented at: https://www.raspberrypi.org/documentation/usage/gpio/README.md which also contains a pinout for the RPI:

Be careful not to link the Ground to the 5V, I've already burned 2 UART to USB chips by doing that!
You don't need to connect the 5V to the 5V at all. I think you can power your Pi like that, but I've read that this is a bad idea, just use the usual USB power source.
Finally, plug the USB side of the connector to your host computer, and get a shell with:
sudo apt install screen
sudo usermod -a -G dialout $USER
screen /dev/ttyUSB0 115200
Exit with Ctrl-A \.
Here is a video by Adafruit showing it: https://www.youtube.com/watch?v=zUBPeoLW16Q
SSH over USB
This might be possible! But I didn't get it to work yet on my Raspberry Pi 3, Raspbian 9.4, Ubuntu 22.04 Lenovo ThinkPad P51 host:
Some commonly quoted steps include:
to boot/config.txt: add:
dtoverlay=dwc2
What that does: What does "dtoverlay=dwc2" REALLY do?
to boot/cmdline.txt: add modules-load=dwc2,g_ether
create an empty file rootfs/boot/ssh e.g. with:
sudo touch rootfs/boot/ssh
This step could also be done from inside the Pi as:
sudo touch /boot/ssh
And then connect with:
ssh [email protected]
But it failed for me with:
ssh: Could not resolve hostname raspberrypi.local: Name or service not known
See also


