38

Is it possible to SSH in to an RPi without a network connection?

I could imagine that you could do it using a LAN cable from the computer to the RPi or maybe using a USB cable.

I do actually have access to a network, however it doesn't allow incoming connections (even from local IP's) to any ports except 80 and 443 I would imagine.

5
  • 3
    Just use a crossover cable, I guess that that is the solution you need ;). Connect all cables in the UTP cable like this: numitechsolutions.com/wp-content/uploads/2012/01/… then connect it with your PI and PC. Give them an IP, done ;).
    – Laurence
    Commented Dec 7, 2012 at 13:41
  • Regarding the connectiong process, there is a great article: Raspberry Pi Remote Connections – Without A Network!. It explains both Mac and Windows laptop configuaration. Commented Jun 19, 2014 at 19:30
  • 1
    With modern Ethernet adapters, crossover is no longer needed. On a Windows box, just 'share' your WIFI network connection (open adapter properties, sharing) with your LAN. The RPI will get IP address from there. This will give you SSH access from the Windows box to your RPi but not external access.
    – fcm
    Commented Mar 3, 2016 at 13:46
  • As fcm comments crossover cables are mostly a thing of the past now; contemporary ethernet interfaces including those on the pi will physically cross-over themselves when plugged together.
    – goldilocks
    Commented Oct 28, 2016 at 7:33
  • I just stuck with this problem also and now I can do it. So I need to share my solution. You can see as this link, topboxbox.blogspot.com/2017/11/…
    – TopBoxBox
    Commented Nov 18, 2017 at 18:56

4 Answers 4

6

No router + no screen + regular Ethernet cable + RPI 2 + Raspbian Lite 2018-11-13 + Ubuntu 18.10

First we must enable the SSH server on the Pi, which is disabled by default for security.

If you already have a shell on the Pi through a non-SSH method such as screen + keyboard or UART (see below), just run:

sudo systemctl enable ssh
sudo service sshd start

as explained at: SSH not working with fresh install This persists across boots.

Otherwise, insert he SD card on your host, and create a magic empty file named ssh file in the boot/ partition.

On Ubuntu hosts, it gets mounted automatically and you can do just:

sudo touch /media/$USER/boot/ssh

which you can confirm with:

lsblk

which contains:

mmcblk0     179:0    0  14.4G  0 disk
├─mmcblk0p1 179:1    0  43.9M  0 part /media/ciro/boot
└─mmcblk0p2 179:2    0  14.4G  0 part /media/ciro/rootfs

If you don't enable the SSHD daemon on the Pi then SSH connection will fail with:

ssh: connect to host 10.42.0.160 port 22: Connection refused

when we try it later on.

After enabling the SSH server

Next, boot the Pi, and link an Ethernet cable from your laptop directly to the Pi:

enter image description here

On Ubuntu 17.04 to work around this bug as mentioned on this answer you first need:

sudo apt-get install dnsmasq-base

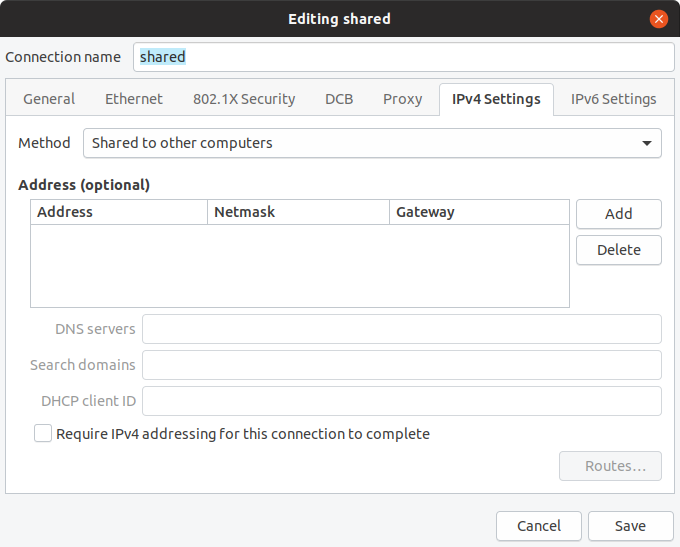
On the host, open the network manager:

nm-connection-editor

And go:

  1. + sign (Add a new connection)
  2. Ethernet
  3. Create
  4. IPv4 Settings
  5. Method: Shared to other computers
  6. Set a good name for it
  7. Save

enter image description here

Find the IP of the Pi on host:

cat /var/lib/misc/dnsmasq.leases

On Ubuntu 23.10 it is insteaad:

sudo bash -c 'tail -n+1 /var/lib/NetworkManager/*.leases'

See also: https://askubuntu.com/questions/219609/how-do-i-show-active-dhcp-leases

These output something like:

1532204957 b8:27:eb:0c:1f:69 10.42.0.160 raspberrypi 01:b8:27:eb:0c:1f:69

10.42.0.160 is the IP, then as usual:

ssh [email protected]

I also have the following in my .bashrc:

piip() ( cat /var/lib/misc/dnsmasq.leases | cut -d ' ' -f 3; )
pissh() ( sshpass -p raspberry ssh "pi@$(piip)"; )

From inside the Pi, notice that it can access the internet normally through your host's other interfaces:

ping google.com

For example on my laptop, the Pi takes up the Ethernet, but the host is also connected to the internet through WiFi.

The crossover cable is not required if the host network card supports Auto MDI-X. This is the case for most recent hardware, including for example the 2012 Lenovo T430 I tested with, which has an "Intel® 82579LM Gigabit Network Connection" which documents support for Auto MDI-X.

Now you can also:

UART serial USB converter

This is an alternative to SSH if you just want to get a shell on the Pi: https://en.wikipedia.org/wiki/Serial_port

This does not use SSH or networking itself, but rather the older, simpler, more direct, more reliable, lower bandwidth, lower distance serial interface. The Pi won't have access to the Internet with this method.

Desktop computers still have a serial port which you can connect directly wire to wire with the Pi, but these are hidden in most laptops, and so we need to buy a cheap USB adapter. Here I've used a "DSD TECH USB to TTL Serial Converter CP2102": https://www.amazon.co.uk/gp/product/B072K3Z3TL See also: https://unix.stackexchange.com/questions/307390/what-is-the-difference-between-ttys0-ttyusb0-and-ttyama0-in-linux/367882#367882

First plug the SD card on the host, and edit the config.txt file present in the first partition to add:

enable_uart=1

as explained at: https://www.raspberrypi.org/forums/viewtopic.php?f=28&t=141195

This first partition contains the bootloader, its configuration files and the (Linux / your) kernel, config.txt being one of them. The second partition contains the actual Linux root filesystem.

Now connect your computer to the Pi as:

enter image description here

You only need to attach 3 jump wires:

  • Ground to Ground
  • Tx on Pi to Rx on the USB to serial port
  • Rx on Pi to Tx on tye USB to serial port

But if you have 4 ump wires laying around, you can also connect the VCC port which then allows you to also power the PI through the USB, this way you only need to plug one thing into the Pi and it starts running, which is very handy.

This is also documented at: https://www.raspberrypi.org/documentation/usage/gpio/README.md which also contains a pinout for the RPI:
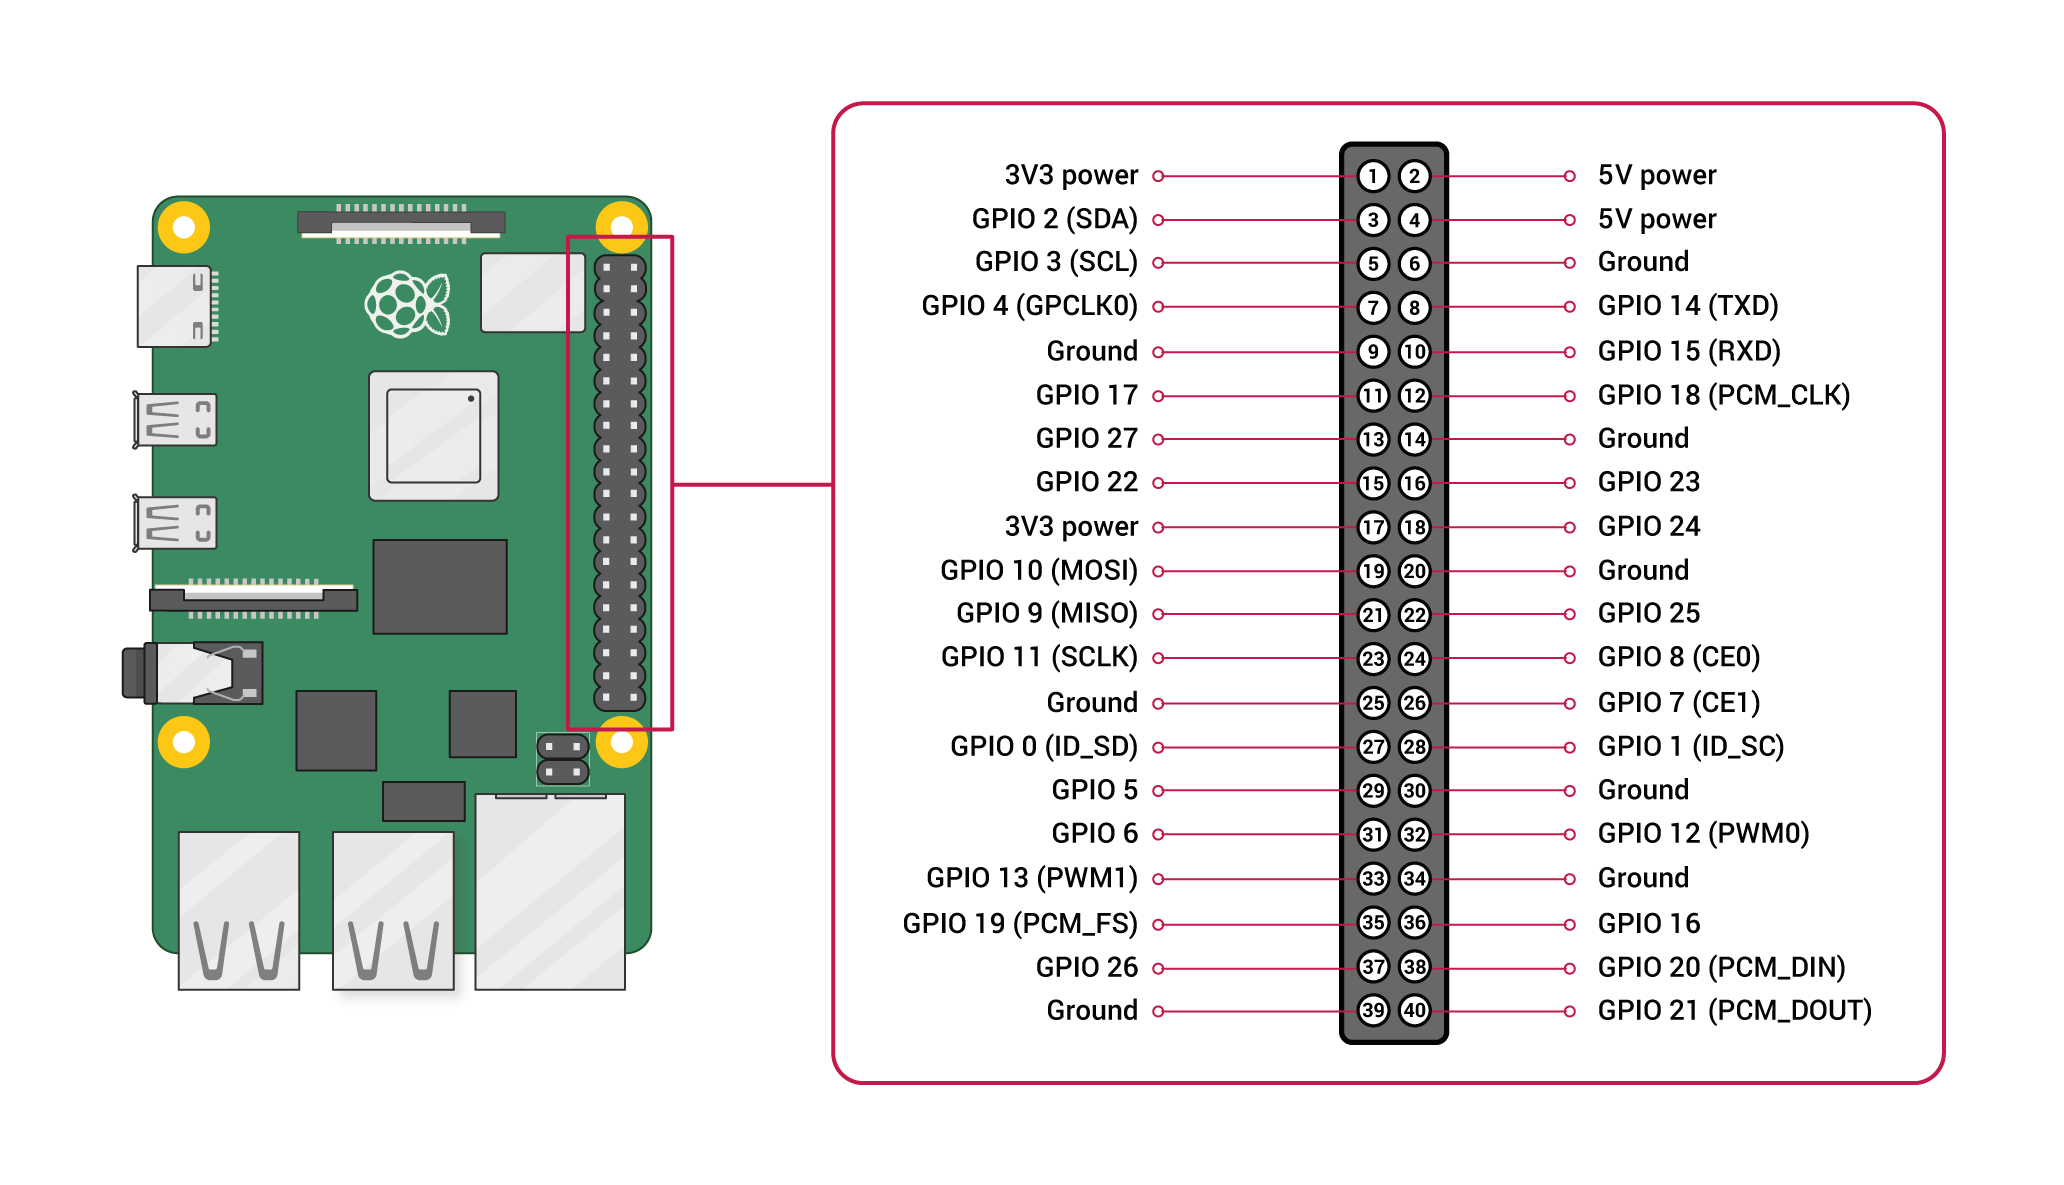
enter image description here

Be careful not to link the Ground to the 5V, I've already burned 2 UART to USB chips by doing that!

You don't need to connect the 5V to the 5V at all. I think you can power your Pi like that, but I've read that this is a bad idea, just use the usual USB power source.

Finally, plug the USB side of the connector to your host computer, and get a shell with:

sudo apt install screen
sudo usermod -a -G dialout $USER
screen /dev/ttyUSB0 115200

Exit with Ctrl-A \.

Here is a video by Adafruit showing it: https://www.youtube.com/watch?v=zUBPeoLW16Q

SSH over USB

This might be possible! But I didn't get it to work yet on my Raspberry Pi 3, Raspbian 9.4, Ubuntu 22.04 Lenovo ThinkPad P51 host:

Some commonly quoted steps include:

  • to boot/config.txt: add:

    dtoverlay=dwc2
    

    What that does: What does "dtoverlay=dwc2" REALLY do?

  • to boot/cmdline.txt: add modules-load=dwc2,g_ether

  • create an empty file rootfs/boot/ssh e.g. with:

    sudo touch rootfs/boot/ssh
    

    This step could also be done from inside the Pi as:

    sudo touch /boot/ssh
    

And then connect with:

ssh [email protected]

But it failed for me with:

ssh: Could not resolve hostname raspberrypi.local: Name or service not known

See also

2
  • You should not repeat always the same answer. Instead make a comment with a link to your first answer or at the most make an new answer with a different aspect and a link to the first answer as reference.
    – Ingo
    Commented Dec 26, 2018 at 1:16
  • 1
    @Ingo I believe this answer is the best one so far for both questions. If you think I haven't answered on of the questions, please let me know how. A comment will just disappear on the sea of comments, and then others will repeat the same content with a different wording. Commented Dec 26, 2018 at 8:40
2

You can easily do it by connecting your pi to laptop via LAN cable. Please make sure that (at list while you are doing it first time) you have dhcp server working on your laptop and listening on LAN interface you are using to connect with pi. You need somehow assign address to raspberry.

2
  • You don't need dhcp.
    – Laurence
    Commented Dec 7, 2012 at 13:44
  • 1
    If you have IP configured statically you don't have to. If not you need something to give you an IP address. Commented Dec 7, 2012 at 14:14
2

For me, the most convenient way is to use USB Tethering on my Android device, connect it to the raspberry and then SSH from my phone to the raspberry.

see this post SSH from Android to rPI using USB?

1

The problem is that you want to connect 2 devices of the same type. But it's still possible. You can use a Crossover cable for this (Method 1), or you could use a switch or hub to automatic make a crossover connection (Method 2). Or just use a simple router (Method 3).

Make a connection possible

Method1:

Use a Crossover cable and connect your PC and PI:

An Ethernet crossover cable is a type of Ethernet cable used to connect computing devices together directly. Normal straight through or patch cables were used to connect from a host network interface controller (a computer or similar device) to a network switch, hub or router. A cable with connections that "cross over" was used to connect two devices of the same type: two hosts or two switches to each other. Owing to the inclusion of Auto-MDIX capability.

You need to connect the cables in the UTP cable like this: http://www.incentre.net/wp-content/uploads/2015/02/ethcablerj45cr.gif

Source: http://en.wikipedia.org/wiki/Ethernet_crossover_cable

Method2:

You also can use a modern twisted pair Ethernet cable to connect to your PI. But you need a hub or switch for this:

connections can be made with a straight-through cable by means of an MDI-X port, also known as an "internal crossover" or "embedded crossover" connection. Hub and switch ports with such internal crossovers are usually labelled as such, with "uplink" or "X". For example, 3Com usually labels their ports 1X, 2X, and so on. In some cases a button is provided to allow a port to act as either a normal or an uplink port.

Source: http://en.wikipedia.org/wiki/Ethernet_over_twisted_pair

More information:

Introduced in 1998, this made the distinction between uplink and normal ports and manual selector switches on older hubs and switches obsolete. If one or both of two connected devices has the automatic MDI/MDI-X configuration feature there is no need for crossover cables. Although Auto-MDIX was specified as an optional feature in the 1000BASE-T standard, in practice it is implemented widely on most interfaces. Besides the eventually agreed upon Automatic MDI/MDI-X, this feature may also be referred to by various vendor-specific terms including: Auto uplink and trade, Universal Cable Recognition and Auto Sensing.

Source: http://en.wikipedia.org/wiki/Ethernet_crossover_cable

Method 3

Use a Router and connect both the PI and PC to the Router.

Make the connection

Give them both an IP in the same range, for example:

PC: 192.168.1.10 Subnet: 255.255.255.0
PI: 192.168.1.11 Subnet: 255.255.255.0

You can find here how to do this: http://www.cyberciti.biz/faq/linux-configure-a-static-ip-address-tutorial/

Enable SSH

http://steve.dynedge.co.uk/2012/05/29/enabling-ssh-on-debian-raspberry-pi/

Connect to the PI

On Windows use for example Putty.

Other method:

You also can look here: http://www.linux-usb.org/usbnet/

5
  • How does method 2 work? Don't I need an active network connection on my computer?
    – Tyilo
    Commented Dec 7, 2012 at 14:01
  • I didn't finished that part jet. Give me 1 sec.
    – Laurence
    Commented Dec 7, 2012 at 14:07
  • 4
    I thought that the time when people have to use crossover cables gone forever :) Right now each and every new ethernet card is able to do crossing without the need of having crossover cable. Commented Dec 8, 2012 at 15:06
  • You never know what kind of PC he has, besides that, you always can try a UTP cable.
    – Laurence
    Commented Dec 9, 2012 at 16:12
  • Normal straight Ethernet cables work on PI 2, read somewhere that its interface can recognize that. Just tested on Ubuntu 16.04, RPI 2 Raspbian 2016.05. Commented Aug 22, 2016 at 18:29

Your Answer

By clicking “Post Your Answer”, you agree to our terms of service and acknowledge you have read our privacy policy.

Not the answer you're looking for? Browse other questions tagged or ask your own question.