3

I just bought a package of sensors online, a few things were really easy to set up, but the DHT11 (3 pin version) temperature and humidity sensor was giving me problems. Here's what I did:

  1. Following directions from this site, containing documentation from the supplier I connected the sensor to 3.3V pin and GND.
  2. Set up software per guidelines.

The issue was that I wasn't able to see the text file of the sensor, which is supposed to give me the hexadecimal readouts of each sensor. I could see the filesystems for each sensor, but there wasn't anything with a reading. Small issue, and for some reason I thought it could be because I wasn't connecting the DHT11 properly. I found this post on this forum, and also this link from another site which stated that the 5V pin should be used. I connected the 5V to the sensor while I hadn't put any resistors in the circuit at all. The Pi crashed immediately, but then came back online with a recovery screen, and worked without issues for a while.

I still was having issues with the DHT11 for unrelated reasons (I'm new to the RPi), so I again tried to connect the DHT11 to the 5V pin because I wasn't sure if the RPi crashed the first time because I had inadvertently bumped the power supply input. Even though I didn't have the data pin connected to the Pi, this attempt killed my Pi. The LED light for power is on, and the 5v pin is still sending about 5.3V vs the ground pins, but that's about all the Pi does now.

Does this make sense that I fried my RPi by connecting the wrong voltage to the sensor? In other words, is the sensor module both so sensitive to voltages that the Pi itself can produce, and so integral to the Pi's function that I could kill the Pi (admittedly by being careless) like this? Any documentation I can read to avoid dumb mistakes like this in the future?

Thanks, looking forward to getting a new one! And brushing up on Ohm's law...

1
  • I think you had the GND pin disconnected the second time, not the DATA pin. You cannot kill a Pi by just powering a sensor from 5V. Omitting the GND connection on the other hand essentially pulls every other pin of the sensor to 5V. Commented Sep 28, 2020 at 8:56

2 Answers 2

1

Following directions from this site, containing documentation from the supplier I connected the sensor to 3.3V pin and GND, ...

OK, no problem. The Kookye tutorial is good.

The issue was that I wasn't able to see the text file of the sensor. Small issue, ...

You mean you weren't able to find the datasheet? This is a big issue. You should google harder.

Errata 2019apr17hkt0854 - The OP refers to a tutorial which uses a text file to log the readings. I did not read that tutorial and so misunderstood what he said. I do agree that the log text file is irrelevant.

I found this post on this forum, and also this link from another site which stated that the 5V pin should be used. I connected the 5V to the sensor while I hadn't put any resistors in the circuit at all. The Pi crashed immediately, but then came back online with a recovery screen, and worked without issues for a while.

Well, many fake forums give fake advice. I am not surprised that your toy crashed immediately.

Does this make sense that I fried my RPi by connecting the wrong voltage to the sensor?

Yes, pretty likely.

  1. I could kill the Pi (admittedly by being careless)
  2. Any documentation I can read to avoid dumb mistakes?
  3. brushing up on Ohm's law...

(1) No, you are not careless. It is one of the common newbie traps, killing Rpi.

(2) It is not a dumb mistake. Not just newbies, even ninjas kill their Rpi this way. The verdict is:

"Putting the Pi down by latching it Up".

(3) Ohm's law isn't enough, you need to know much more than that.

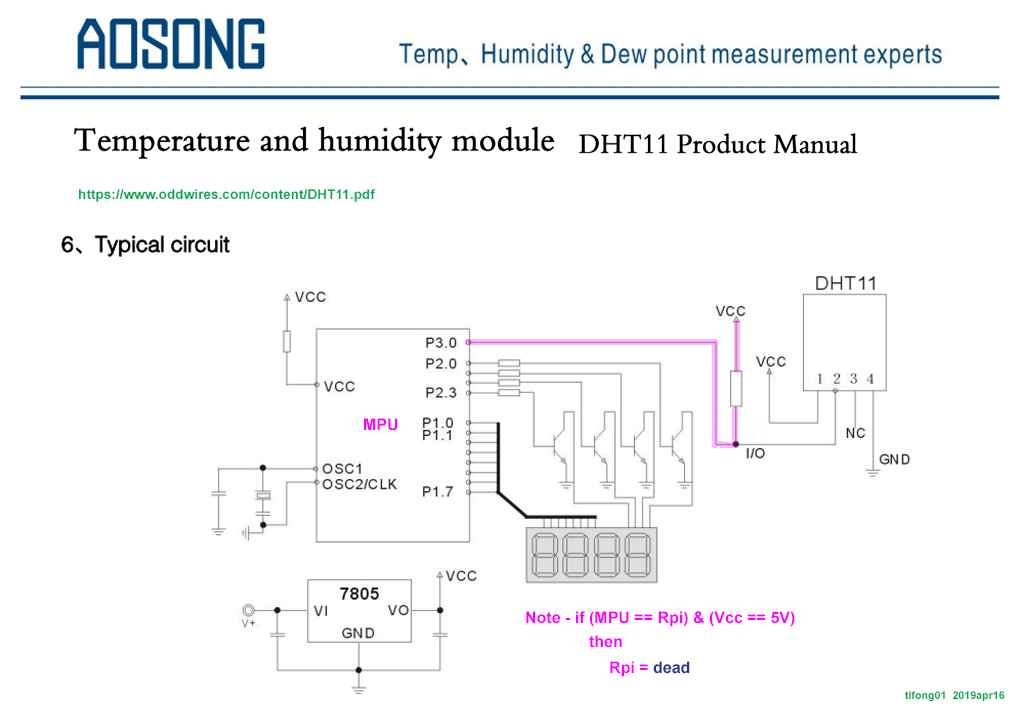
It is a long story that I am going to tell later. First, an illustration.

latching up

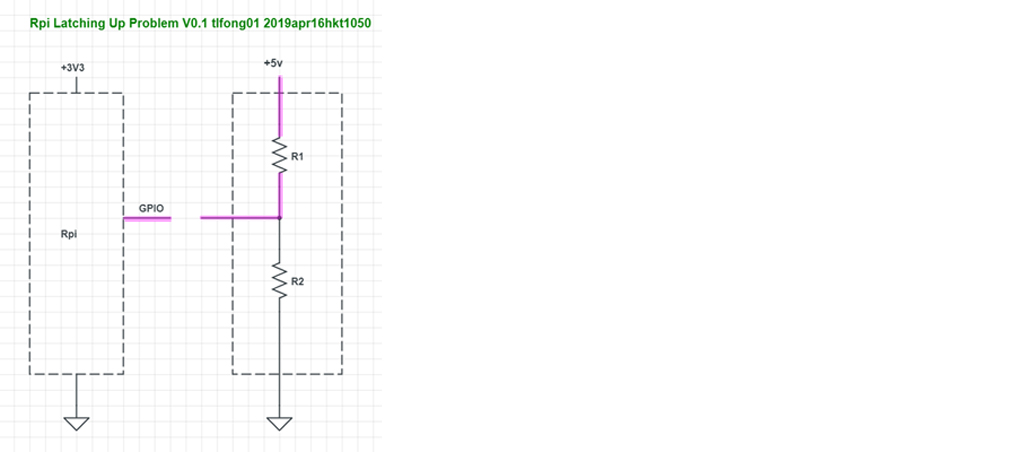
The Dangerous Configuration Causing Latching Up

Newbies usually unintentionally connect a resistor between GPIO and 5V, in many situations include the following.

For an Arduino low trigger 5V relay. Rpi GPIO Low signal can switch on relay, but cannot switch it off, because the relay is designed to switch off when High signal is above 4V, the Arduino standard High. However, Rpi High is only around 3V, therefore not High enough to switch off the relay. In other words, the relay is always on.

The clever newbies have invented many ways to get around the Rpi High not high enough problem.

  1. Set GPIO to input mode. This way is almost electrically equivalent to a 5V High signal as seen by the relay, which happily then switches off.

  2. Pull GPIO up by a 10k resistor, wrongly and dangerously hoping that GPIO can therefore go higher enough to switch off the relay.

Both methods might cause latch up. The configuration is illustrated below.

rpi latching up

I forgot to ask the OP to check if he did setup Rpi

Now, some references on latching up:

GPIO Electrical Specifications Raspberry Pi input and output pin voltage and current capability - Mosiac Documentation Web

GPIO pin circuitry

The internal diodes shown in the figure are not really substrate diodes, but they are actually parasitic FETs.

Electrically, their I-V characteristic looks like a diode's, but with a greater forward drop and a more gradual knee.

They may protect against low current transient events caused by transient out-of-range voltages applied to the pins, but they are not intended to protect against the application of voltages greater than the supply voltage or less than ground, even with an external series resistor.

In brief, you should never deliberately forward bias those "diodes". Consequently, you can not safely place an external pull-up resistor to 5V on the I/O [GPIO] pin. That would forward bias a parasitic FET and owing to its poor internal impedance to the chip's internal power rail it may overheat, or worse, it may bias up parts of the chip to voltages greater than they can handle.

So, don't do it!

Latch-up - Wikipedia

Parasitic structure - Wikipedia

/ to continue, ...

References

DHT11 Datasheet - Aslong

How to set up DHT11 on Rpi - Kookye

2
  • Just edited my question to elaborate on the "text file" I was referencing. This is the file that contains the actual readout of the sensor(s), and it was missing when I had the sensor connected properly. In retrospect I should've just used the Python interface, but you know what they say about hindsight. Now, back to this story...
    – rajan
    Commented Apr 16, 2019 at 5:43
  • Ah, when I started my answer, I had not gone through the tutorial, so I did not know the tutorial uses a text file. I usually just print it out in the console. Anyway, I agree that you just go back try the python example again.
    – tlfong01
    Commented Apr 16, 2019 at 15:05
1

TL;DR: Do not power the DHT11 with 5V and drive rPI GPIO with 5V: you risk damaging your rPi

The OP did not include the pull-up resistor, which I assume is to ensure that GPIO is driven with 3.3V (NOT 5V):

I found this post on this forum, and also this link from another site which stated that the 5V pin should be used. I connected the 5V to the sensor while I hadn't put any resistors in the circuit at all. The Pi crashed immediately, but then came back online with a recovery screen, and worked without issues for a while.

Joan advised that a pull-up resistor was required in a 5V configuration:

It should be possible to do as follows: Connect Pi 5V to sensor +, Pi ground to sensor ground, and any GPIO to sensor data. You ALSO need to connect a 4k7 (or thereabouts) resistor between the data line and 3V3. In other words leave the data line pull-up connected to 3V3 but power from 5V. I have not tested this but I'm told it will work by those who know more than me.

It is not clear to me that Joan's statement will work nor is it clear if it will damage your raspberry pi. I do not advocate Joan's untested solution, however, if you are brave enough and willing to test this configuration, then by all means post your results whether you are successful or it damages your raspberry pi

Your Answer

By clicking “Post Your Answer”, you agree to our terms of service and acknowledge you have read our privacy policy.

Not the answer you're looking for? Browse other questions tagged or ask your own question.